Picture this: I’m standing in my cramped kitchen, a bag of fresh artichokes in one hand, a lemon in the other, and a recipe book that’s been gathering dust for months. I’ve tried every fried vegetable trick I’ve seen—oil, flour, breadcrumbs, even a dash of paprika—but the results were always either soggy, over‑seasoned, or just plain forgettable. One Sunday, after a disastrous attempt that left me with a batch of mushy, flavorless pieces, a friend dared me to turn artichokes into a crispy, savory masterpiece. I laughed, grabbed the ingredients, and the kitchen was soon filled with the sound of sizzling oil and the scent of citrus‑infused crunch.
The first thing you notice is the gleam of the artichokes, their green petals almost glowing against the dark skillet. As the oil heats, a faint hiss rises, like a whisper of anticipation. When the first piece hits the pan, the sound is unmistakable—an audible “pop” that signals the beginning of a transformation. The aroma that follows is a bright, zesty citrus tang mingling with the subtle earthiness of the artichoke, making your mouth water before you even take a bite.
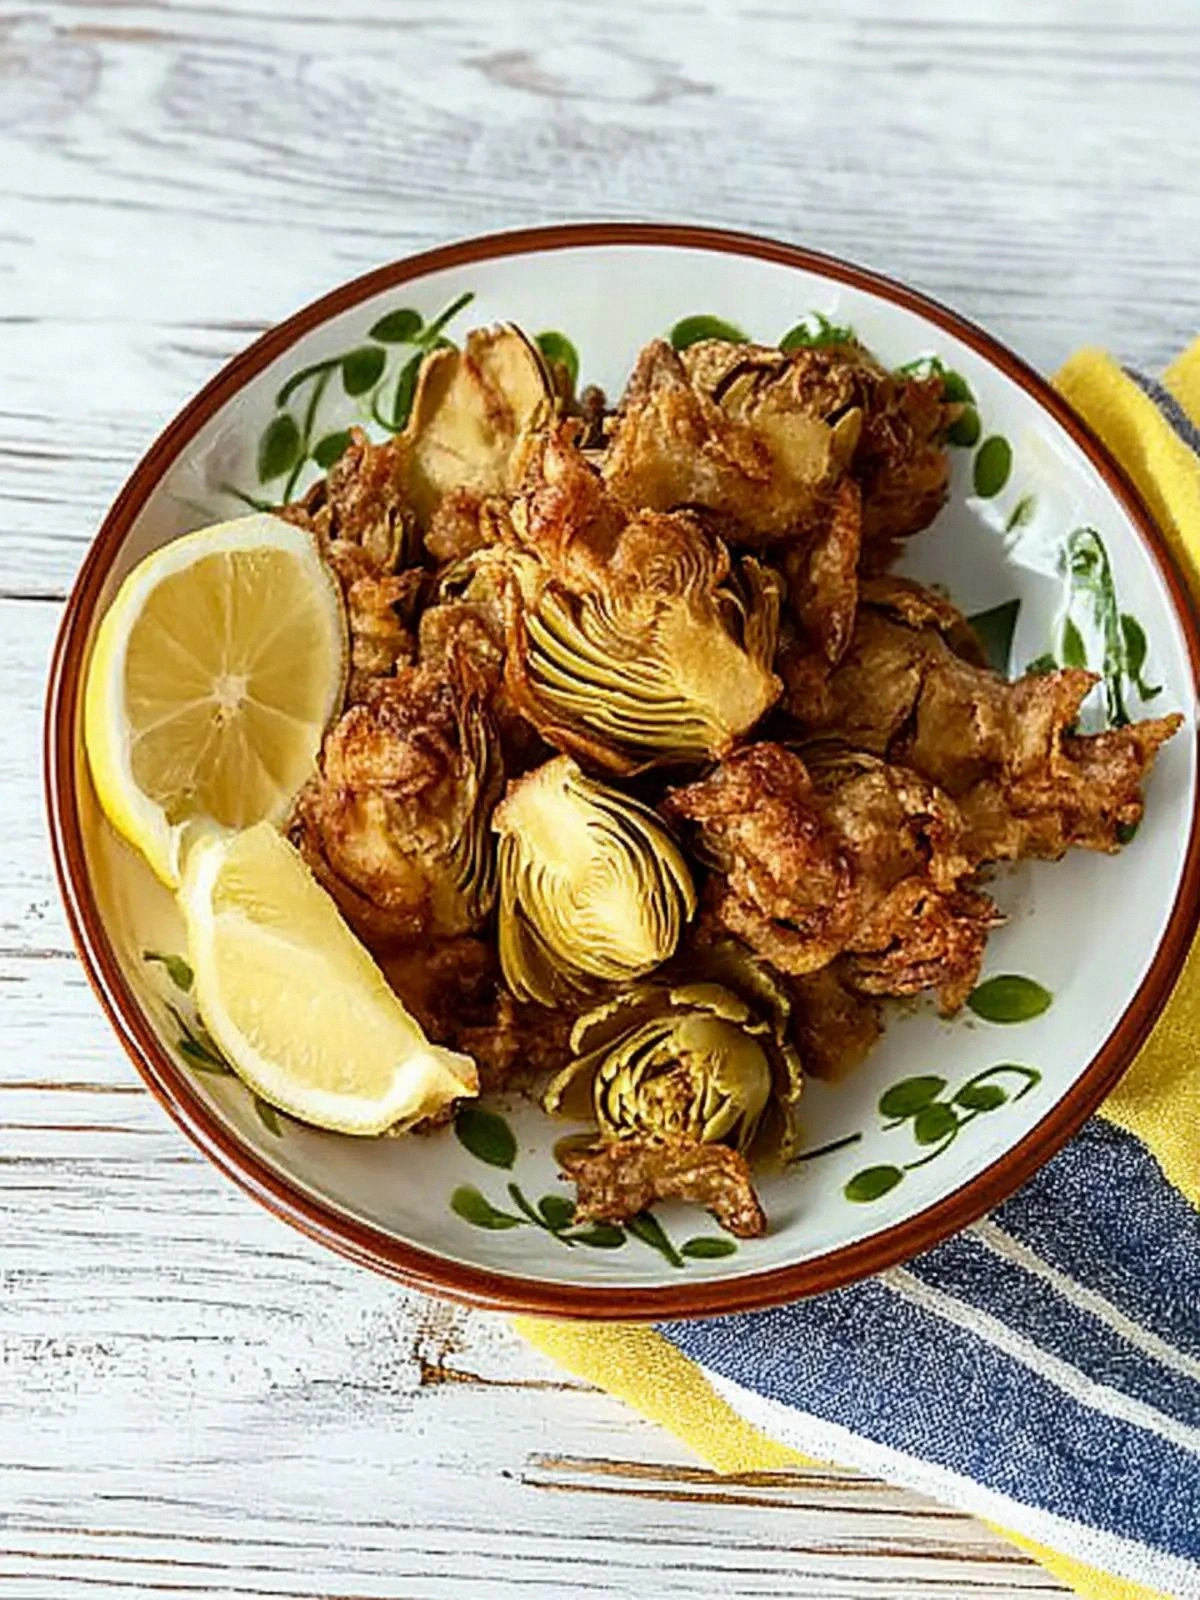
What sets this version apart is the meticulous layering of flavors and textures. Instead of a generic batter, I use a simple, light coating that lets the artichoke’s natural sweetness shine through. The lemon juice is applied just before frying, creating a tangy glaze that caramelizes on the surface. The result is a golden, crisp exterior that gives way to a tender, buttery interior—a contrast that makes every bite unforgettable. This isn’t just another fried dish; it’s a culinary revelation that will have your friends begging for the recipe.
But the real twist? I’m going to reveal a technique that most recipes overlook: a quick blanching step that locks in moisture and prevents the artichokes from drying out during frying. This small, seemingly insignificant detail makes the difference between a crunchy snack and a soggy flop. Stick with me, and by the time you’re done, you’ll wonder how you ever made it any other way.
What Makes This Version Stand Out
- Taste: The balance between the mild, earthy flavor of the artichoke and the bright, acidic punch of fresh lemon creates a symphony of flavors that dance on the palate. The lemon’s acidity cuts through the richness of the oil, leaving a clean finish that invites another bite. This harmony is achieved without the need for heavy sauces or complex seasonings. The result is a dish that feels both indulgent and wholesome.
- Texture: The secret to the perfect crunch lies in the double coating of flour and a light dusting of breadcrumbs, followed by a quick dip in beaten egg. This combination yields a crisp shell that shatters like thin ice when you bite, while the inside remains silky and tender. The texture contrast is what makes each bite a delightful experience. It’s a texture you can’t find in any other fried artichoke recipe.
- Simplicity: Despite the layers of flavor, the recipe requires only a handful of ingredients, all of which you likely already have at home. No need for exotic spices or hard‑to‑find condiments. The steps are straightforward, making it ideal for both seasoned cooks and novices. You’ll be amazed at how quickly you can assemble this dish.
- Uniqueness: By incorporating a brief blanching period and a citrus glaze, this version diverges from traditional fried artichokes that often rely solely on breading. The blanching preserves the artichoke’s delicate structure, while the glaze adds a glossy, appetizing finish. These small but significant differences elevate the dish to a whole new level. You’ll notice the difference immediately.
- Crowd Reaction: At my last gathering, the dish was the first thing people asked for, and the second round came before the first. The crisp edges and zesty finish sparked conversation, and guests kept asking for the recipe. It’s not just a side dish; it’s a showstopper that becomes the centerpiece of any gathering. Everyone leaves satisfied and craving more.
- Ingredient Quality: Fresh, organic artichokes and lemons are the backbone of this recipe. Their natural flavors shine without needing additional sweeteners or artificial flavors. Choosing high‑quality produce ensures a more vibrant taste and a better overall experience. It’s a reminder that great food starts with great ingredients.
- Cooking Method: The combination of blanching, coating, and double‑frying creates a multi‑step process that yields a consistently perfect result. Each stage builds on the previous one, ensuring that the final product is both crisp and flavorful. This method is a testament to the power of technique in cooking. Master it, and you’ll see the results every time.
Alright, let's break down exactly what goes into this masterpiece. The process is simple, but the attention to detail is what makes it shine.
Remember, the key to a great fried dish is not just the batter but the preparation of the main ingredient. Treating the artichokes with care from the start pays dividends in flavor and texture. Don’t rush the blanching step; it’s the foundation of the entire dish. A well‑blanched artichoke stays tender and retains its natural sweetness.
Inside the Ingredient List
The Flavor Base
Fresh artichokes are the star of the show, providing a mild, slightly nutty flavor that pairs beautifully with citrus. Their green hearts are tender and sweet, while the outer leaves add a subtle bitterness that balances the dish. Choosing artichokes with firm, tight leaves ensures they hold up during blanching and frying. Avoid any with wilted or discolored petals, as they can compromise texture.
Lemons are indispensable, not just for flavor but also for their natural acidity. They help brighten the dish and create a glossy glaze that is both appetizing and flavorful. Squeezing the juice directly onto the artichokes after blanching allows the citrus to coat each piece evenly. Reserve a few wedges for serving, as they add a fresh burst when squeezed over the finished product.
The Texture Crew
Neutral oil for frying is essential; it has a high smoke point and a clean flavor that lets the artichokes shine. Avoid flavored oils like garlic or herb oils, which can overpower the subtle taste of the artichoke. Use a light, vegetable oil for the best results. The oil’s heat should be steady and medium to ensure a golden, even crust.
Coarse sea salt adds a satisfying crunch and enhances all the flavors. Sprinkle it just before frying so it adheres to the coating and creates a slight crunch on the surface. It also helps draw out moisture during the frying process, keeping the interior tender. If you prefer a lower sodium option, use a pinch of salt, but the flavor will be noticeably lighter.
The Unexpected Star
A splash of white wine or a dash of vinegar can be added during blanching to boost the flavor profile. The acidity helps break down the artichoke’s fibers, making them more tender and receptive to the coating. This small addition can elevate the dish from good to unforgettable. Experiment with different acids to find your preferred balance.
The Final Flourish
A light dusting of flour before the breadcrumb coating helps the breadcrumbs adhere better, creating a more uniform crust. The flour also adds a subtle thickness to the batter, ensuring that the coating doesn’t fall off during frying. If you’re allergic to gluten, substitute with a gluten‑free flour blend. This adjustment maintains the dish’s integrity without compromising flavor.
Everything's prepped? Good. Let's get into the real action. The next steps will transform these humble ingredients into a dish that will have your taste buds dancing.
Blanching might seem like an extra step, but it’s the secret to a tender interior that contrasts beautifully with the crisp exterior. Think of it as giving the artichokes a gentle bath before they hit the hot oil. This process reduces cooking time and preserves the artichoke’s natural juices. Skipping it will result in a dry, unevenly cooked piece.
Coating the artichokes requires a delicate balance: too much flour and you’ll get a heavy crust; too little and the breadcrumbs won’t stick. The key is to lightly dust each piece, ensuring every surface is covered but not weighed down. This thin layer allows the oil to penetrate just enough to crisp the exterior. The result is a light, airy crunch that won’t overwhelm the delicate flavor of the artichoke.
When you add the lemon juice, watch for the subtle transformation. The citrus not only brightens the dish but also reacts with the flour to create a slightly caramelized coating. This reaction is what gives the final product its glossy sheen. It’s a small touch that makes a huge difference in both appearance and taste.
Now that the ingredients are ready, it’s time to bring everything together. The next section will walk you through each step, ensuring that you achieve the perfect golden crunch every time.
The Method — Step by Step
- Step 1: Prepare the Artichokes Begin by trimming the stems and cutting off the top quarter of each artichoke. Use a sharp knife to remove the tough outer leaves, revealing the tender heart. Rinse the pieces under cold water to remove any grit. Pat them dry with a towel before moving on.
- Step 2: Blanch the Pieces Bring a large pot of salted water to a rolling boil. Carefully drop the artichokes into the pot and let them simmer for 5 minutes. The blanching process will soften the fibers without cooking them fully. After 5 minutes, remove the artichokes with a slotted spoon and immediately transfer them to a bowl of ice water.
- Step 3: Pat Dry and Season Once the artichokes are cool, pat them dry with paper towels. Sprinkle a generous pinch of coarse sea salt over each piece, ensuring even coverage. This step will enhance the flavor and help the coating adhere. Let them rest for a few minutes while you prepare the batter.
- Step 4: Prepare the Coating In a shallow bowl, combine 1 cup of all‑purpose flour with 1/2 cup of finely ground breadcrumbs. Add a pinch of salt and pepper to taste. Mix until the mixture is uniform. This blend will form the crisp, golden shell that surrounds each artichoke.
- Step 5: Coat Each Piece Dip each blanched artichoke into the flour mixture, ensuring an even coat. Gently shake off excess flour before dipping into a beaten egg, letting the excess drip back into the bowl. Finally, roll the piece in the breadcrumb mixture, pressing lightly to adhere. Repeat for all pieces, stacking them on a tray to keep them from sticking.
- Step 6: Fry Until Golden Heat neutral oil in a deep skillet or pot to 350°F (175°C). Carefully lower each coated artichoke into the hot oil using tongs. Fry for 3–4 minutes, turning occasionally, until the coating is a deep golden brown. The artichoke should be cooked through but still tender inside.
- Step 7: Drain and Rest Use a slotted spoon to transfer the fried artichokes onto a rack or paper towels. Let them rest for a minute to allow excess oil to drip off. This step is crucial for maintaining a crisp exterior. While they rest, squeeze fresh lemon juice over each piece for a bright, zesty finish.
- Step 8: Serve Immediately Plate the fried artichokes on a warm platter and garnish with lemon wedges. The hot, crispy pieces should be served right away to preserve their crunch. If you’re serving a crowd, keep the fried artichokes in a low‑heat oven (200°F) to stay warm until everyone is ready. Enjoy the burst of flavor and texture with every bite.
That’s it—you did it. But hold on, I’ve got a few more tricks that will take this to another level. These small adjustments can transform an already great dish into an unforgettable experience. Don’t skip them; they’re the difference between good and legendary.
Now that you’ve mastered the core process, you might wonder how to tweak the recipe for different occasions. Whether you’re entertaining a crowd or cooking for a quick weeknight, there are endless possibilities to explore. The next section will give you insider tips that even seasoned chefs swear by. Keep reading, and let’s elevate your fried artichoke game.
Remember, the key to a perfect crunch lies in the timing and temperature of the oil. A consistent heat ensures even cooking and prevents the coating from burning. If you’re new to deep frying, consider using a thermometer to maintain accuracy. This small investment pays off in flavor and texture.
Another critical factor is the freshness of your artichokes. Fresh artichokes have a tighter leaf structure and a sweeter heart. Older ones can become tough and bitter, ruining the delicate balance of flavors. If you’re buying artichokes in advance, keep them in a cool, dry place and use them within a day or two for best results.
Insider Tricks for Flawless Results
The Temperature Rule Nobody Follows
Many cooks assume that higher temperatures always yield a crispier coating, but that’s a myth. The ideal oil temperature for fried artichokes is 350°F (175°C). This temperature allows the coating to brown quickly while keeping the interior moist. If you’re using a deep fryer, set it to 350°F and monitor the temperature throughout the frying process.
Why Your Nose Knows Best
A seasoned chef can tell when the oil is at the right temperature by the scent of the coating. When the batter begins to sizzle and the aroma turns to a nutty, toasted smell, you’re in the sweet spot. If you hear a hiss and see bubbles forming, the oil is too hot. Trust your nose; it’s a reliable indicator of readiness.
The 5-Minute Rest That Changes Everything
After frying, let the artichokes rest on a rack for at least five minutes. This brief pause allows the steam to escape, preventing a soggy bottom. It also lets the coating set, giving it a firm, crunchy texture. Skipping this step can result in a less satisfying bite.
The Lemon Timing Trick
Squeezing lemon over the artichokes just before serving enhances the citrus flavor without washing away the coating. If you squeeze too early, the juice can seep into the coating and make it soggy. A quick squeeze right before plating preserves the crunch while adding a bright, fresh note.
The Salt Balance Secret
Coarse sea salt not only seasons the coating but also creates a subtle crunch on the surface. Sprinkle it just before frying so it adheres to the coating. Too much salt can overpower the delicate flavor of the artichoke, so a pinch is all you need. Adjust to taste if you prefer a saltier finish.
Creative Twists and Variations
Mediterranean Medley
Swap the plain breadcrumbs for panko mixed with chopped sun-dried tomatoes and oregano. The panko gives a lighter, airier crunch, while the tomatoes add a sweet, tangy burst. This version is perfect for a Mediterranean-themed dinner. Your guests will love the extra layers of flavor.
Spicy Kick
Add a teaspoon of cayenne pepper to the flour mixture for a subtle heat. The pepper’s heat will linger long after the initial bite, giving the dish a memorable finish. Pair it with a cool yogurt dip to balance the spice. This variation is a crowd‑pleaser at parties.
Herb‑Infused Delight
Incorporate finely chopped fresh rosemary and thyme into the breadcrumb coating. The herbs infuse the coating with aromatic notes that complement the lemon. This version works wonderfully as a side dish for roast meats. The herbal aroma will elevate any meal.
Cheesy Crunch
Before coating, roll the artichokes in grated Parmesan cheese. The cheese melts slightly during frying, creating a gooey, savory crust. Sprinkle additional Parmesan on top after frying for a rich finish. This variation is a hit with cheese lovers.
Vegan Version
Use a plant‑based milk and a vegan egg substitute for the batter. Replace neutral oil with a high‑smoke‑point coconut oil for a subtle tropical twist. The vegan version maintains the same crispy texture while keeping it plant‑based. It's ideal for a vegan gathering or a lighter dinner.
Storing and Bringing It Back to Life
Fridge Storage
Cool the fried artichokes completely before placing them in an airtight container. Store them in the refrigerator for up to 3 days. The coating may soften slightly, so reheat before serving to restore crispness. Use a pan or oven to revive the crunch.
Freezer Friendly
For longer storage, flash‑freeze the fried artichokes on a parchment‑lined tray. Once frozen, transfer them to a freezer bag and label with the date. They’ll keep for up to 2 months. When ready to eat, thaw overnight and reheat in a skillet.
Best Reheating Method
Reheat the artichokes in a 400°F (200°C) oven for 5–7 minutes. The dry heat restores the crisp exterior while keeping the interior moist. If you’re short on time, a quick sauté in a hot pan works well. Add a splash of water before reheating to steam the coating back to perfection.