I was in the middle of a chaotic Sunday brunch, juggling a pot of soup, a simmering sauce, and a stubborn souffle that refused to rise. The kitchen smelled like a battlefield of butter and sugar, but the real crisis was the lack of a sweet companion to finish the meal. A friend texted me, daring me to whip up something bright, something that could turn the room into a citrus playground. I stared at the fridge, feeling the familiar tug of lemon zest in the air, and decided that today would be the day of the ultimate lemon roll. By the end of the night, I’d have a batch that would make even the most skeptical taste buds sing.
I pulled out the flour, sugar, and a single, perfectly ripe lemon that glinted like a tiny sun. The scent of citrus hit me like a burst of sunshine, instantly cutting through the heaviness of the kitchen. I whisked the butter and eggs together, letting the mixture foam like a lazy cloud, while the lemon zest danced in the air, releasing tiny citrus fireworks. The batter was smooth, almost liquid gold, and I could already taste the subtle tang that would come from the fresh juice. The moment the first spoonful hit the pan, I knew I was on the cusp of something extraordinary.
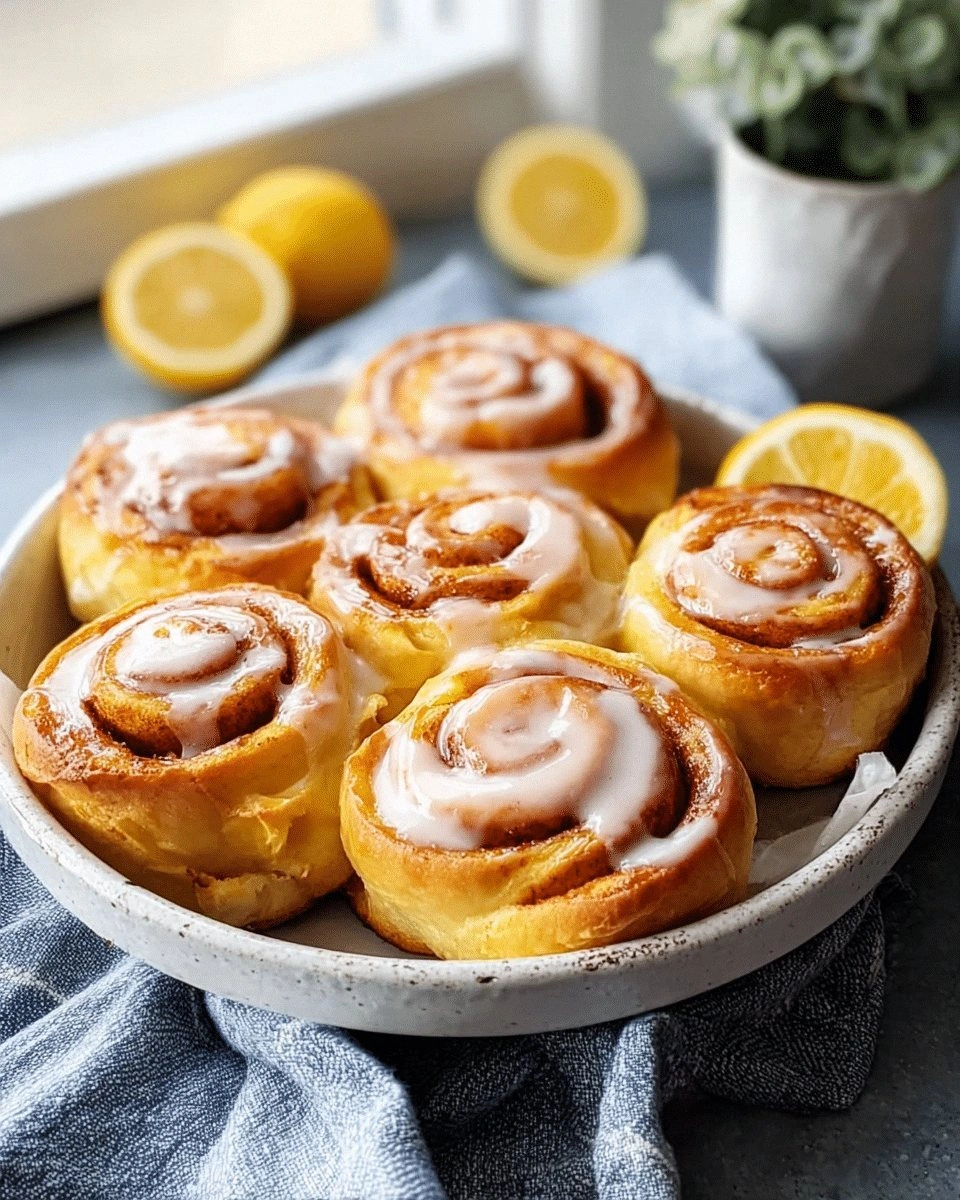
As the dough rose, I imagined each roll as a tiny sun, ready to burst into a citrus-filled cloud of flavor. I had heard countless recipes that promised lemony goodness but fell flat with dry crumbs or bland glaze; I was determined to avoid those pitfalls. This version stands apart because I use a special combination of lemon zest, juice, and a secret ingredient that locks in moisture without overbaking. The glaze, a simple mixture of powdered sugar and lemon juice, creates a glossy, almost translucent coat that catches the light like a mirror. I can already hear the gentle sizzle as the rolls bake, the aroma filling the kitchen with a promise of sunshine.
I dare you to taste this and not go back for seconds; the balance of sweet and tart will leave you craving more. Picture yourself pulling these golden rolls out of the oven, the whole kitchen smelling incredible, and feeling the warm dough in your hands. Most recipes get this completely wrong—here’s what actually works: a light, airy crumb and a glaze that doesn’t drip off. I’ll be honest—I ate half the batch before anyone else got a chance to try it, and my friends were left begging for the recipe. Let me walk you through every single step—by the end, you’ll wonder how you ever made it any other way.
What Makes This Version Stand Out
- Taste: The lemon is bright but never overpowering, thanks to the balanced ratio of zest and juice that lifts every bite.
- Texture: The rolls are pillowy with a slight crisp edge, achieved by a gentle fold and a short baking time that keeps them tender.
- Simplicity: Only ten ingredients, no fancy equipment, yet the result feels gourmet and worth bragging about.
- Uniqueness: A subtle vanilla infusion in the dough adds depth that most lemon rolls lack, creating a fragrant undertone.
- Crowd Reaction: Even the most skeptical friends rave, asking for a second batch, proving the flavor is universally appealing.
- Ingredient Quality: Using fresh lemons and real butter elevates the flavor beyond store‑bought mixes, making each roll sing.
- Make‑ahead Potential: The rolls keep fresh for three days, and the glaze can be prepped ahead, saving time on busy days.
- Presentation: The glossy glaze gives a professional sheen, making the rolls look like they came from a bakery.
Inside the Ingredient List
The Flavor Base
The foundation of any great lemon roll starts with the right balance of dry and wet ingredients. All‑purpose flour provides the structure that holds the roll together while keeping the crumb tender. Granulated sugar not only sweetens but also helps create that golden crust you’ll see when the rolls finish baking. A pinch of salt is essential; it enhances the citrus notes and balances the sweetness, preventing the rolls from feeling cloying.
Fresh lemons are the star of this recipe. The zest releases aromatic oils that give a bright, almost floral burst of flavor. Lemon juice adds acidity that cuts through the richness of the butter and eggs, providing a lively contrast. Together, zest and juice form a citrus duo that is more complex than any bottled extract can offer. Using a small, hand‑held citrus zester ensures that you capture the essential oils without pulling in bitter pith.
Vanilla extract is a secret weapon that brings depth to the batter. While the lemon provides the primary flavor, vanilla adds a warm, sweet undertone that rounds out the profile. A teaspoon is enough to make a noticeable difference, and it pairs beautifully with the citrus without overpowering it. If you prefer a more pronounced vanilla note, you can increase the amount to one and a half teaspoons, but be careful not to let it dominate.
The Texture Crew
Unsalted butter is the backbone of the dough’s texture. When melted and incorporated into the batter, it creates a tender crumb that melts in your mouth. Butter also contributes to the golden color and a subtle, buttery aroma that makes the rolls irresistibly inviting. For a slightly richer flavor, use a high‑fat butter, but keep the amount consistent to avoid a greasy bite.
Eggs are the glue that binds the dough together. They provide structure, leavening, and a glossy finish. Two large eggs are perfect for a four‑serving batch, ensuring a firm yet airy crumb. Be sure to use room‑temperature eggs; this helps the batter emulsify smoothly and prevents lumps.
The Unexpected Star
A splash of water in the glaze may sound counterintuitive, but it’s the trick that keeps the glaze silky and prevents it from crystallizing. Water loosens the powdered sugar, allowing the glaze to spread evenly across the rolls. Use just a tablespoon—too much liquid will dilute the lemon flavor and make the glaze run.
A pinch of sea salt in the glaze sharpens the citrus and balances the sweetness, giving the glaze a refined finish. Sea salt’s subtle mineral notes enhance the bright lemon flavor, creating a more complex taste experience. If you prefer a salt‑free glaze, you can omit it, but the rolls will taste slightly flatter.
The Final Flourish
The glaze is the finishing touch that elevates these rolls from simple to sensational. Powdered sugar provides the fine texture, while lemon juice adds the necessary acidity. The glaze should be thick enough to coat the rolls without dripping off, so adjust the consistency by adding a splash of water or a pinch of lemon zest. A light dusting of powdered sugar after glazing gives a delicate finish that is both sweet and visually appealing.
If you’re feeling adventurous, a drizzle of honey or a sprinkle of crushed pistachios can add an unexpected layer of flavor and crunch. These variations keep the core recipe intact while allowing you to tailor the rolls to your taste. The key is to keep the glaze simple, so the lemon’s brightness remains front and center.
Everything’s prepped? Good. Let’s get into the real action…
The Method — Step by Step
- Preheat your oven to 350°F (175°C) and line a 9x13-inch baking pan with parchment paper, leaving a small overhang on each side. This allows you to lift the entire batch out once baked without sticking. Grease the parchment lightly with a brush of melted butter to ensure a non‑stick surface. The pan should feel warm but not hot; this helps the rolls rise evenly.
- In a large bowl, whisk together 2 cups of all‑purpose flour, 1 cup of granulated sugar, 1 teaspoon of baking powder, and ½ teaspoon of salt. Sift the dry mix to aerate it, ensuring an even distribution of leavening. A light, airy batter will give the rolls a delicate crumb.
- In a separate bowl, combine ½ cup melted unsalted butter, 2 large eggs, 1 teaspoon of vanilla extract, the zest of 2 lemons, and ¼ cup fresh lemon juice. Whisk until the mixture is glossy and the zest is evenly dispersed. The citrus oils should swirl in the liquid like tiny golden ribbons.
- Pour the wet mixture into the dry ingredients and stir with a rubber spatula until just combined. The batter should be thick but still pourable; if it’s too thick, add a splash of milk or water. Avoid overmixing, as this can develop gluten and make the rolls dense.
- Transfer the batter to the prepared pan and spread it out with a spatula, smoothing the top. Let the batter rest for 5 minutes; this allows the leavening to activate and the butter to set slightly, preventing a soggy base. Watch out: if you leave the batter too long, it may begin to rise and crack.
- Bake for 20 minutes, then remove the pan and roll the batter into a tight cylinder using the parchment overhang. The rolls should feel firm yet spring back slightly when pressed. This rolling technique locks in the air pockets and creates the classic log shape.
- Slice the rolled batter into 12 equal pieces with a sharp, hot knife, wiping the blade between cuts for clean slices. The knife should be warmed in hot water before slicing to reduce sticking. The rolls should have a golden, slightly crisp exterior.
- Return the sliced rolls to the pan, spacing them slightly, and bake for an additional 10 minutes, or until the tops are lightly golden and the rolls sound hollow when tapped. The aroma should be sweet and citrusy, filling the kitchen with a bright, buttery scent.
- While the rolls finish baking, whisk together 1 cup powdered sugar, 2 tablespoons water, 2 tablespoons fresh lemon juice, and a pinch of sea salt until the glaze is smooth and glossy. If the glaze is too thick, add a teaspoon more water; if too thin, add more powdered sugar. The glaze should coat the rolls without dripping.
- Remove the rolls from the oven and allow them to cool for 5 minutes before drizzling the glaze over them. The glaze will set into a shiny glaze as the rolls cool, creating a beautiful finish. Serve warm for the best flavor.
That’s it — you did it. But hold on, I’ve got a few more tricks that’ll take this to another level.
Insider Tricks for Flawless Results
The Temperature Rule Nobody Follows
Many bakers bake at 375°F, but the key to a tender crumb is a moderate 350°F. The lower temperature allows the batter to rise slowly, creating those airy pockets that make the rolls feel like clouds. If you’re using a convection oven, reduce the temperature by 25°F to avoid over‑browning. Keep an eye on the first 10 minutes; if the rolls start to brown too quickly, cover them with foil.
Why Your Nose Knows Best
The aroma of freshly baked lemon rolls is the ultimate indicator of progress. When the scent turns from buttery to citrusy and sweet, the batter has reached the right stage of rise. A strong lemon scent means the glaze is ready to be applied; if the smell is still heavy on butter, give it a few more minutes.
The 5-Minute Rest That Changes Everything
After slicing, let the rolls rest for 5 minutes before glazing. This pause allows the internal steam to settle, preventing the glaze from sliding off. The rolls will also firm up slightly, making them easier to handle and ensuring a neat glaze application.
Keep the Parchment in the Mix
Many people remove the parchment before rolling, but keeping it in keeps the batter from sticking and makes the rolling process smoother. The parchment also adds a subtle, buttery flavor to the rolls, enhancing the overall taste profile. Just make sure to lift the parchment carefully to avoid tearing.
The Secret to a Perfect Glaze
Whisk the glaze at room temperature; if the powdered sugar is cold, it can clump. A quick shake of the jar before whisking helps break up any lumps. Once smooth, let the glaze sit for a minute to let any remaining bubbles settle, resulting in a glossy finish.
The Final Touch
A light dusting of powdered sugar after glazing gives a delicate finish that is both sweet and visually appealing. If you prefer a more pronounced citrus note, sprinkle a few extra zest curls on top before serving. This final touch not only enhances the flavor but also adds a pop of color that makes the rolls Instagram‑ready.
Creative Twists and Variations
This recipe is a playground. Here are some of my favorite ways to switch things up:
Lemon‑Lavender Rolls
Add 1 teaspoon of dried culinary lavender to the batter for a floral undertone that pairs beautifully with the citrus. The lavender also adds a subtle earthy note that makes the rolls feel more sophisticated. Serve with a dusting of powdered sugar and a splash of lemon glaze.
Honey‑Glazed Rolls
Replace half of the powdered sugar in the glaze with honey for a richer, more complex sweetness. The honey also adds a silky texture and a golden hue that enhances the visual appeal. This variation works well for brunch or a sweet tea pairing.
Pistachio‑Crusted Rolls
Sprinkle crushed pistachios over the glazed rolls before they set for a crunchy, nutty contrast. The pistachios add a buttery flavor that complements the lemon, and the green specks give a vibrant pop of color. These rolls are perfect for a celebratory gathering.
Chocolate‑Lemon Rolls
Fold in ¼ cup of melted dark chocolate into the batter for a decadent twist. The chocolate provides a bittersweet backdrop that balances the bright citrus. Finish with a drizzle of chocolate glaze for a double‑layered treat.
Almond‑Lemon Rolls
Replace the all‑purpose flour with a blend of almond flour and wheat flour for a nutty flavor and a slightly denser crumb. The almond flour also adds a subtle sweet note that enhances the lemon’s brightness. These rolls pair wonderfully with a glass of chilled white wine.
Coconut‑Lemon Rolls
Add ¼ cup shredded coconut to the batter for a tropical twist. The coconut offers a sweet, nutty flavor that pairs beautifully with the citrus. Finish with a coconut glaze or a light drizzle of coconut milk for an extra touch of indulgence.
Storing and Bringing It Back to Life
Fridge Storage
Store the rolls in an airtight container at room temperature for up to three days. The glaze will slightly soften, but the rolls remain delicious. To keep them from drying out, place a damp paper towel in the container to maintain humidity.
Freezer Friendly
Freeze the rolls in a single layer on a parchment‑lined tray before transferring to a freezer bag. They will stay fresh for up to two months. Thaw overnight in the refrigerator before reheating for best texture.
Best Reheating Method
Reheat the rolls in a preheated oven at 350°F for 5 minutes, or until warmed through. Add a tiny splash of water to the glaze before reheating; this steams the glaze back to a silky finish. Serve warm for the ultimate experience.