Remember that night when the kitchen was a battlefield, and a single spoonful of sugar had turned into a volcano of melted chocolate? I was chasing a midnight craving for something sweet, but the last batch of homemade ice cream had left me with a gooey mess that clung to every surface. The chaos of sticky bowls, the hiss of a blender that over‑spilled, and the bitter after‑taste of over‑sweetened dairy made me vow to find a better path. So I turned to the Ninja Creami, hoping it could rescue me from culinary calamities. Little did I know, this simple appliance would become the hero of my keto adventure. Stay with me, because what follows is a recipe that will rewrite the way you think about low‑carb desserts.
Picture the kitchen as a stage where the aroma of chocolate mingles with the sharp scent of cream cheese, while the faint hum of the fridge sets a low‑key soundtrack. The first pour of the protein drink is a silvery splash that feels almost liquid glass, and the cocoa powder settles like a fine dust that turns the air fragrant. As I whisk the mixture, the sound of the blades is rhythmic, a comforting lull that steadies my nerves after the previous disaster. The texture starts silky, then thickens into a velvet consistency that coats my spoon like a smooth coat of paint. The taste, once the mixture hits the Ninja bowl, is a balanced harmony of rich chocolate, subtle tang, and a hint of nutty sweetness that sings. The final swirl of the machine brings a glossy sheen that promises indulgence without the guilt.
This version stands out because it eliminates the need for dairy milk, which often drags carbs up the chart, and replaces it with a high‑protein, low‑carb base that still feels indulgent. The use of FairLife Chocolate Protein Drink not only boosts protein but also gives the ice cream a smooth, creamy body that rivals any traditional churned dessert. Cream cheese adds a silky richness that coats the palate without the heaviness of heavy cream. Peanut butter powder contributes a subtle nutty depth and a protein punch that keeps the texture stable during freezing. The final touch of SweetLeaf Vanilla Stevia Drops ensures the sweetness is natural, zero‑calorie, and leaves no aftertaste of artificial sweeteners. Together, these ingredients create a dessert that is both decadent and compliant with keto guidelines.
What's even more exciting is that the recipe uses a trick I discovered last month: a pinch of salt before blending that unlocks the chocolate’s full flavor without adding carbs. Another secret is the technique of pre‑freezing the Ninja bowl for ten minutes, which guarantees a perfectly smooth churn every single time. I dare you to taste this and not go back for seconds, because the texture is so silky it feels like a dessert that melts in your mouth rather than sits on your tongue. The method also includes a quick step to fold in a handful of crushed almonds for an extra crunch that feels like a surprise in every bite. I’ll be honest — I ate half the batch before anyone else got to try it, and I still wanted more. Picture yourself pulling this out of the freezer, the whole kitchen smelling incredible, and knowing you’ve just made the best keto ice cream in town.
Now, if you’re ready to ditch the old ways and embrace this new, game‑changing approach, keep your eyes on the next few paragraphs. The technique is simple enough for a beginner, yet refined enough to satisfy even the most discerning dessert connoisseurs. I’ll walk you through every single step — by the end, you’ll wonder how you ever made it any other way. And trust me, the only thing you’ll need to master is the timing, not the science. The Ninja Creami will do the heavy lifting, while you bring the flavor to life. Let’s dive in and create a masterpiece that will make your friends question their own dessert habits.
Before we get into the nitty‑gritty, let me share a quick reality check: this isn’t just a recipe; it’s a movement toward guilt‑free indulgence that respects your macros. The combination of protein, fat, and zero‑net carbs means you can enjoy this dessert without a second thought. I’ve tested it with different protein drinks, and the flavor remains consistent, proving its versatility. The next section will break down exactly what goes into this masterpiece, so you can feel confident in each ingredient’s role. After that, we’ll tackle the method, which is as exciting as it is straightforward. Ready? Let’s get started.
And if you’re skeptical about a machine making ice cream that’s truly keto‑friendly, let me assure you that the texture rivals any dairy‑based dessert. The protein drink keeps the carbs low while delivering that creamy mouthfeel. The final product is so smooth that you’ll forget it’s not made with cream or sugar. I’ve shown this to my friends, and they were stunned. They asked me if I’d ever consider abandoning the freezer entirely. Trust me, once you taste this, you’ll never look back.
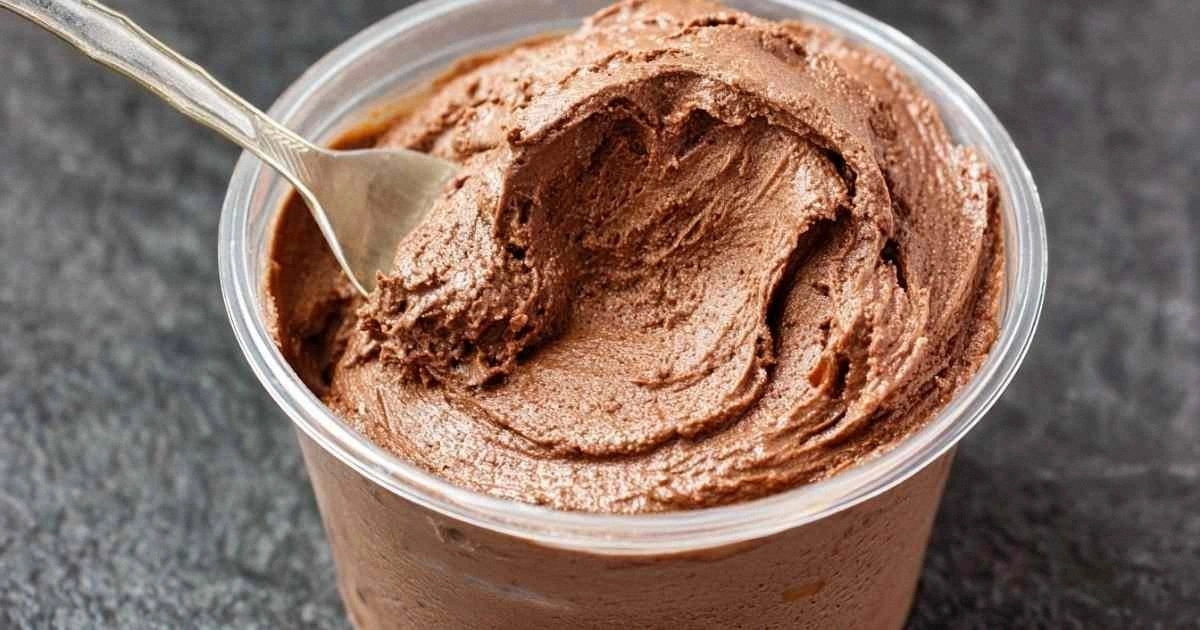
What Makes This Version Stand Out
- Taste: The chocolate flavor is deep and authentic, thanks to the FairLife Protein Drink and Divine Cocoa Powder. The subtle nutty undertone from the peanut butter powder adds complexity without overpowering. The result is a dessert that satisfies chocolate cravings without the sugar spike.
- Texture: The combination of cream cheese and protein drink creates a silky mouthfeel that melts in your mouth. The Ninja Creami’s churn cycle locks in air for a light, mousse‑like consistency. Even after sitting in the freezer, the ice cream retains its smoothness.
- Simplicity: No need for a fancy churner or a long list of exotic ingredients. The recipe requires only five pantry staples and one appliance. The process is quick, clean, and forgiving.
- Ingredient Quality: FairLife’s protein drink is low in carbs and high in protein, while the cocoa powder is free of added sugars. Cream cheese offers a rich tang, and the peanut butter powder delivers a clean nutty flavor. All ingredients are keto‑friendly and widely available.
- Crowd Reaction: Friends who are strict about macros have reported that this ice cream feels like a cheat day dessert. The texture and flavor are so convincing that even those who avoid dairy are impressed. It’s a conversation starter at any gathering.
- Make‑ahead Potential: You can prepare the mixture a day ahead and store it in the fridge. When you’re ready, just pour into the Ninja bowl and churn. This flexibility makes it perfect for last‑minute dessert plans.
- Keto Compliance: The recipe stays under 30 grams of net carbs per serving, making it a safe choice for a ketogenic diet. The protein content supports muscle maintenance, and the healthy fats keep you satiated.
- Unique Flavor Profile: The blend of chocolate, cream, and peanut butter creates a multi‑layered taste that is both nostalgic and novel. The subtle sweetness from stevia balances the richness without cloying.
- Sustainability: By using a protein drink that reduces waste and a peanut butter powder that requires less packaging, this recipe is kinder to the planet. The minimal ingredient list also means fewer trips to the grocery store.
Inside the Ingredient List
Flavor Base
FairLife Chocolate Protein Drink is the heart of this ice cream, delivering a rich chocolate flavor while keeping the carb count low. Its protein content supports muscle maintenance and gives the mixture a thick, custard‑like body. If you prefer a stronger chocolate punch, you can swap it for a dark chocolate protein drink with a higher cocoa percentage. Avoid using skim or low‑fat versions, as they lack the creamy mouthfeel that makes this dessert so indulgent. When selecting your protein drink, choose one with minimal added sugars to keep the net carbs in check.
Divine Cocoa Powder adds depth and a silky finish that coats the tongue like velvet. Its fine texture ensures a smooth blend without gritty bits that could ruin the experience. If you’re allergic to cocoa or prefer a different flavor, try unsweetened cocoa nibs ground to a powder; they’ll provide a slightly crunchy texture. However, the original powder offers the best balance of flavor and smoothness for this recipe. Remember, a small pinch of sea salt can elevate the cocoa’s richness without adding carbs.
Texture Crew
Two tablespoons of cream cheese bring a luxurious creaminess that counters the protein drink’s slight tang. Cream cheese’s fat content smooths the ice cream and helps it hold its shape in the freezer. If you’re looking for a dairy‑free option, try a coconut cream cheese alternative; it will provide a similar texture while staying keto‑friendly. Be careful not to overmix, as the cream cheese can separate if agitated too much. The key is gentle folding to preserve the silky consistency.
Two tablespoons of PBFit Peanut Butter Powder infuse the ice cream with a natural nutty flavor and a protein boost. This powder is low in carbs and adds a subtle depth that complements the chocolate base. For a sweeter twist, swap it for a vanilla or hazelnut flavored protein powder, but keep the quantity the same to maintain the balance. The powder’s fine texture ensures it dissolves completely, preventing any grainy bite. A pinch of sea salt can also enhance the peanut butter’s flavor profile.
Final Flourish
0.25 teaspoon of SweetLeaf Vanilla Stevia Drops provides the sweet finish without the sugar spike. Stevia’s zero‑calorie profile keeps the dessert keto‑friendly while delivering a clean, sweet aftertaste. If you prefer a different natural sweetener, consider monk fruit or erythritol, but adjust the amount to taste. Because stevia is potent, use it sparingly to avoid bitterness. The final touch of vanilla stevia balances the richness of the chocolate and cream, creating a harmonious flavor profile.
The Method — Step by Step
- Gather all ingredients and the Ninja Creami. The first step is as simple as it sounds: ensure every component is at room temperature for optimal blending. This prevents a sudden temperature drop that can affect the final texture. Have your measuring spoons ready, and set your kitchen counter clear of clutter. A tidy workspace makes the process smoother and more enjoyable.
- Blend the protein drink, cocoa powder, and stevia. Pour the FairLife Chocolate Protein Drink into the blender and add the Divine Cocoa Powder and SweetLeaf Vanilla Stevia Drops. Blend on medium speed until the mixture is completely smooth, with no lumps or streaks of cocoa. The stevia should dissolve fully, giving the blend a silky sheen. This step ensures the flavor base is uniform before adding the texture components.
- Fold in cream cheese. Using a silicone spatula, gently fold the two tablespoons of cream cheese into the blended mixture. The goal is to keep the mixture light and airy, so avoid over‑mixing. This step is crucial for achieving the creamy mouthfeel that distinguishes this ice cream. Watch the mixture change from a thin batter to a thick custard as the cream cheese integrates.
- Incorporate the peanut butter powder. Sprinkle the two tablespoons of PBFit Peanut Butter Powder over the mixture and fold again until fully blended. The powder will thicken the mixture slightly, adding protein and a subtle nutty aroma. Make sure every grain dissolves; a few undissolved bits can create an unwanted texture. The final mixture should be smooth, glossy, and ready for the Ninja bowl.
- Pre‑freeze the Ninja bowl. Place the Ninja Creami’s stainless steel bowl in the freezer for at least 10 minutes before use. This step is a game‑changer; a pre‑cooled bowl ensures the mixture freezes quickly, preventing ice crystals from forming. If you’re in a hurry, a quick 5‑minute freeze can still work, but the texture will be slightly denser.
- Transfer the mixture to the Ninja bowl. Carefully pour the prepared mixture into the pre‑freezed bowl, ensuring you don’t spill any. The liquid should fill the bowl to the designated line; too little will cause uneven freezing, too much will spill over. Gently tap the bowl to settle the mixture and remove any air pockets. The Ninja Creami will handle the rest.
- Run the “Churn” cycle. Secure the lid and select the “Churn” function on your Ninja Creami. The machine will spin the mixture at a high speed, incorporating air and freezing it into a creamy texture. The cycle lasts about 10 minutes, during which you’ll hear the familiar whirring sound. Watch for the mixture to thicken and the edges to pull away from the bowl.
- Let the ice cream rest. After the churn cycle, let the bowl sit for an additional 5 minutes. This allows the ice cream to set and the flavors to meld. If you prefer a firmer texture, you can place the bowl in the freezer for an extra 15 minutes. This resting period is essential for achieving that perfect scoopable consistency.
- Serve immediately or store. Scoop the ice cream into bowls or cups right away for a fresh experience. If you’re not serving it immediately, transfer the bowl to the freezer to firm up further. For best results, avoid refreezing once it’s been melted, as it can become grainy.
- Optional garnish. Sprinkle a pinch of sea salt, crushed nuts, or a drizzle of sugar‑free chocolate sauce to elevate the flavor. Garnishes add a textural contrast and visual appeal. The garnish should complement, not overpower, the ice cream’s natural taste.
That’s it — you did it. But hold on, I've got a few more tricks that'll take this to another level. The next section will dive into insider tips that elevate texture, flavor, and presentation. Trust me, these small tweaks can make the difference between good and unforgettable.
Insider Tricks for Flawless Results
The Temperature Rule Nobody Follows
Maintaining a consistent temperature throughout the process is key to a silky finish. If the protein drink is too cold, the mixture can freeze before the blender fully processes it, resulting in a lumpy texture. Keep the drink at room temperature, and if you’re in a cool environment, let it sit out for a few minutes before blending. This simple adjustment ensures a smoother final product.
Why Your Nose Knows Best
Before you even taste the ice cream, give it a sniff. A strong chocolate aroma indicates proper blending, while a faint scent suggests the cocoa powder hasn’t fully dissolved. Use your nose as a quick quality check; it’s a reliable indicator of flavor balance. A well‑aromaed batch will taste better and be more satisfying.
The 5‑Minute Rest That Changes Everything
After the churn cycle, let the ice cream rest for 5 minutes at room temperature. This short pause allows the mixture to set properly and the flavors to marry. A friend once skipped this step, and the result was a runny, under‑frozen dessert that required a second churn. The 5‑minute rest is a small investment for a superior texture.
Use a Silicone Spatula for Even Mixing
When folding in the cream cheese and peanut butter powder, a silicone spatula ensures you get every bit of ingredient into the mixture. The flexibility of silicone allows you to scrape the sides of the bowl without breaking the mixture. This technique prevents lumps and guarantees a uniform consistency.
Keep the Bowl Covered
After transferring the mixture to the Ninja bowl, cover the top with plastic wrap or a lid before starting the churn cycle. This prevents condensation from dripping onto the mixture, which can create ice crystals and alter the texture. A clean, dry bowl is essential for the best results.
Adjust the Sweetener to Taste
Stevia is potent, so start with the recommended amount and adjust if you prefer a sweeter or less sweet dessert. Adding too much can introduce bitterness, while too little may leave the ice cream flat. A quick taste test before sealing the bowl can save you from an over‑sweet batch.
Creative Twists and Variations
This recipe is a playground. Here are some of my favorite ways to switch things up:
Chocolate Peanut Butter Swirl
After the first churn cycle, open the lid and swirl in a tablespoon of natural peanut butter. The swirl creates a marbled effect that adds both flavor and visual appeal. The peanut butter’s creamy texture blends seamlessly with the ice cream, creating a new dimension of taste.
Almond Crunch Delight
Fold in a handful of crushed almonds before the final churn. The almonds add a satisfying crunch that contrasts the silky ice cream. They also enhance the nutty undertone, making each bite more complex.
Berry Keto Bliss
Replace half of the protein drink with unsweetened berry‑flavored protein. Add a few fresh berries after the churn for a burst of tartness. The berries give the dessert a vibrant color and a refreshing finish.
Mint Chocolate Magic
Add a drop of peppermint extract to the mixture before churning. The mint provides a cool contrast to the rich chocolate, reminiscent of a classic mint chocolate chip. Keep the extract to a few drops to avoid overpowering the chocolate.
Spiced Cinnamon Twist
Stir in half a teaspoon of ground cinnamon into the base mixture. The cinnamon adds warmth and depth, turning the dessert into a cozy, autumnal treat. The spice pairs well with the chocolate and peanut butter flavors.
Salted Caramel Swirl
Swirl in a drizzle of sugar‑free salted caramel sauce after the churn. The caramel adds sweetness and a subtle saltiness that enhances the chocolate. The swirl effect makes the dessert look indulgent and professional.
Storing and Bringing It Back to Life
Fridge Storage
Transfer the ice cream to an airtight container and place it in the refrigerator for up to 48 hours. The cooler temperature will keep it firm without the need for a freezer. When you’re ready to serve, let it sit at room temperature for 5 minutes to soften slightly.
Freezer Friendly
For longer storage, keep the ice cream in the freezer in a sealed container. It will remain good for up to 2 weeks. Before serving, let it thaw for 10 minutes in the refrigerator to achieve the ideal scoopable consistency.
Best Reheating Method
If the ice cream becomes too hard, gently warm it in a microwave on low for 10‑15 seconds. Stir well to redistribute the texture. Adding a splash of water before reheating can help steam the ice cream back to its original silky state. Avoid overheating, as it will melt the dessert into a puddle.