Picture this: a Saturday afternoon, the kitchen humming with the low roar of the oven, and I, armed with a half‑baked batch of croissants that had turned into a soggy, greasy mishap, staring at a blank sheet of parchment. The disaster was the catalyst for a craving that could not be satisfied by any pastry on the shelf. I was determined to create something that would make my taste buds do a happy dance while my friends begged for seconds.
I opened the pantry, inhaled the buttery aroma of cold butter, and imagined a dough that would rise like a cloud and crackle like fresh snow. The air was thick with anticipation, the sound of the mixer’s whirring blades like a promise. My fingertips tingled with excitement as I measured flour, sugar, and yeast, feeling the grains shift between my fingers like a secret. The kitchen smelled of vanilla and butter, a scent that whispered of comfort and adventure. The heat from the oven promised a golden crust that would crack open with a satisfying pop, revealing a pillowy interior.
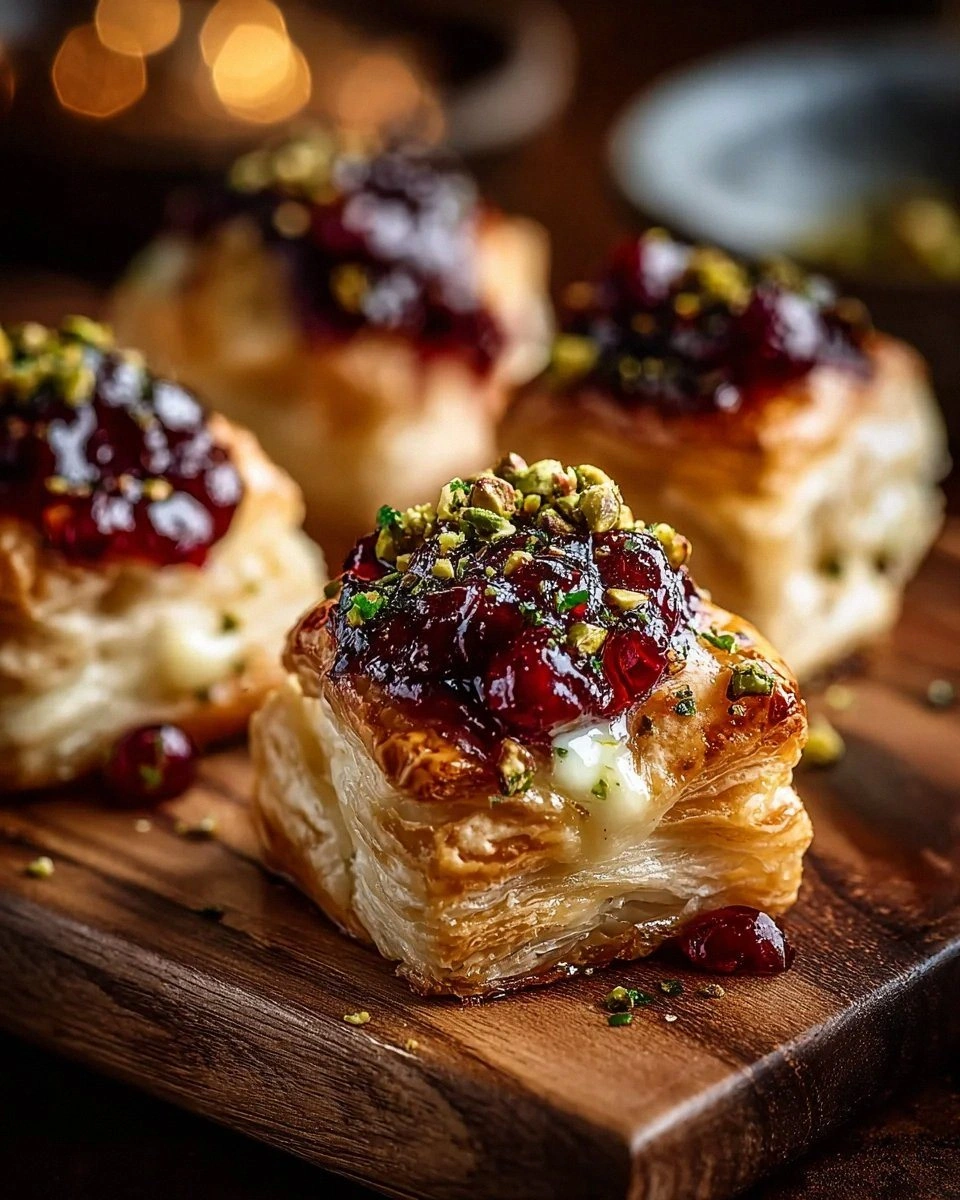
What makes this version stand out is not just the buttery layers, but the way we fuse the flaky elegance of croissants with the indulgent heart of a donut. I dare you to taste this and not go back for seconds—once you experience that buttery, airy bite, the ordinary pastries will feel like a distant memory. The secret lies in a simple trick: a double‑folded dough that traps steam, creating a texture that feels like a cloud on your tongue. It’s not just a pastry; it’s a culinary revelation that will have your friends asking for the recipe.
I’ll be honest—after the first bite, I ate half the batch before anyone else could even get a piece. That moment of triumph was electric, the dough’s crisp edges shattering like thin ice as the filling oozed out. The contrast between the buttery crispness and the sweet, spiced filling is a symphony of flavors that will leave you craving more. Most recipes get this completely wrong, layering the dough too thin or over‑baking the filling, but here we get the perfect balance of crisp and gooey.
Picture yourself pulling this out of the oven, the whole kitchen smelling incredible, the golden crust glistening like a sunrise. The first bite is a burst of buttery, slightly sweet flavor, followed by a soft, caramelized center that melts in your mouth. The aroma alone will make your neighbors come knocking, hoping for a taste of the magic. The moment you take that first bite, you’ll know you’ve discovered a new family favorite.
And now, the fun part—this next part? Pure magic. We’ll walk through each step, from dough to final glaze, ensuring every detail is covered. By the end, you’ll wonder how you ever made it any other way. I’ll share the exact measurements, the timing, and the little hacks that make this recipe unbeatable. Let’s dive in and create something that will have everyone begging for the recipe.
If you’ve ever struggled with flaky pastries, you’re not alone—this is the fix you’ve been waiting for. The dough is simple, the technique is foolproof, and the result is a pastry that feels like a warm hug. Stay with me here—this is worth it. The next few minutes will transform your kitchen into a pastry wonderland. You’ll feel the dough rise like a dream, the butter melt into a golden glaze, and the filling swirl into a caramelized masterpiece. Let’s get started.
What Makes This Version Stand Out
- Flavor: The combination of butter, a hint of vanilla, and a touch of cinnamon creates a flavor profile that feels both familiar and adventurous.
- Texture: The dough is layered to create a flaky exterior that gives way to a soft, pillowy interior, a contrast that delights the palate.
- Ease: The method is straightforward, with minimal steps, making it accessible to both beginners and seasoned bakers alike.
- Versatility: The recipe can be adapted for sweet or savory fillings, opening a world of creative possibilities.
- Crowd‑Pleaser: Whether you’re serving a brunch crowd or a holiday gathering, these cruffins will become the centerpiece.
- Ingredient Quality: Using high‑grade butter and fresh yeast elevates the entire experience, ensuring every bite is rich and buttery.
- Make‑Ahead Potential: The dough can be prepared a day in advance, allowing you to focus on the final baking when guests arrive.
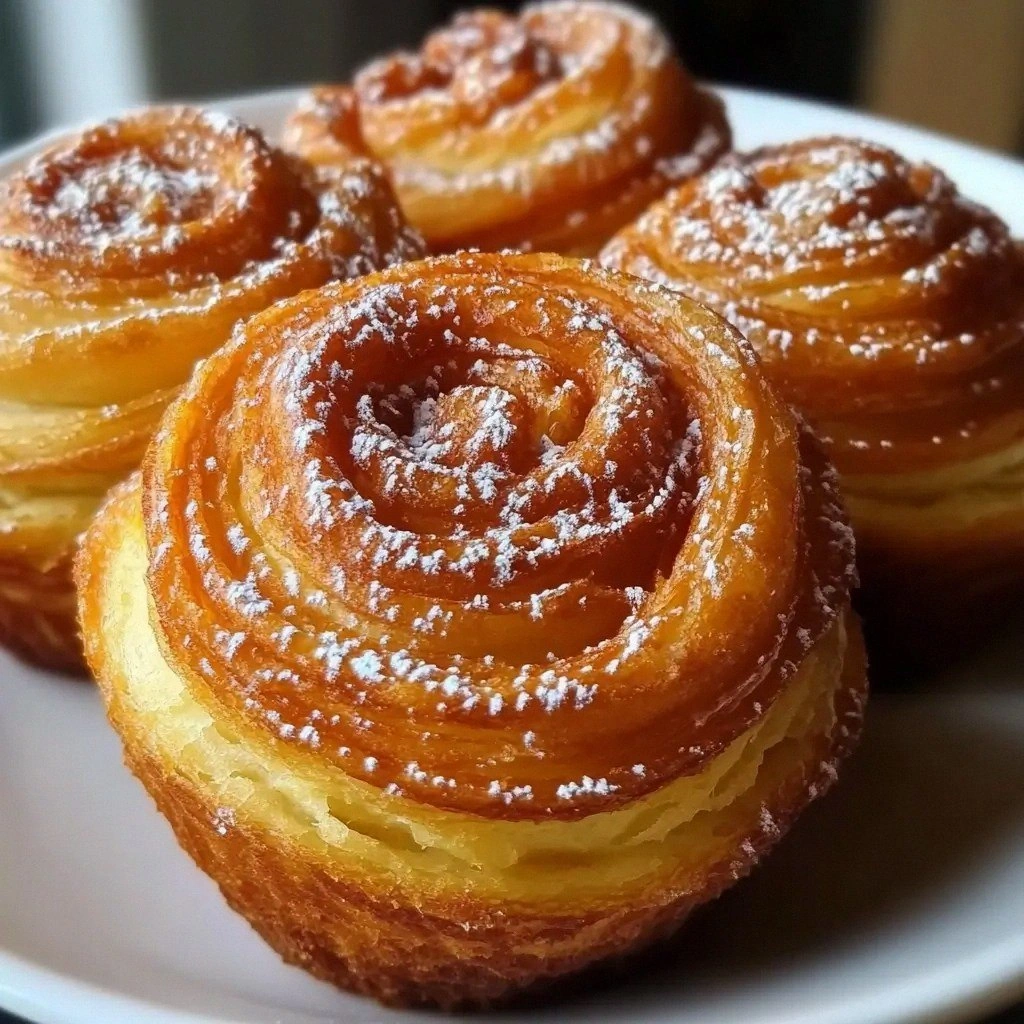
- Presentation: The golden, glossy finish and the dusting of powdered sugar give these pastries a show‑stopper look.
Alright, let’s break down exactly what goes into this masterpiece. Each ingredient plays a vital role, and I’ll explain why it matters and what happens if you skip it. I’ll also give you swaps and alternatives, so you can customize the recipe to your taste.
Inside the Ingredient List
The Flavor Base
All‑purpose flour is the backbone of the dough, providing structure and a neutral canvas that lets the butter shine. If you use a lower‑protein flour, the dough will be softer but may not rise as well. For a richer flavor, try substituting half of the flour with pastry flour, which has a slightly lower protein content and yields a more tender crumb.
Unsalted butter, cold and cut into cubes, is the star of the show. It creates the flaky layers as it melts during baking. If you can’t find butter, you can use a high‑fat margarine, but be aware that the flavor will shift slightly. The key is to keep the butter cold until the dough is ready to bake.
The Texture Crew
Active dry yeast activates the dough, causing it to rise and develop a light, airy structure. If you use instant yeast instead, reduce the amount by one quarter and skip the proofing step. This flexibility makes the recipe adaptable to what’s in your pantry.
Warm milk is the liquid that brings everything together, hydrating the flour and activating the yeast. The temperature should be around 110°F; too hot and you’ll kill the yeast, too cold and the dough will take forever to rise. A good trick is to add a pinch of sugar to the milk; it feeds the yeast and speeds up the rise.
The Unexpected Star
Eggs add richness, help bind the dough, and contribute to a golden crust. If you’re vegan, you can replace each egg with a tablespoon of flaxseed meal mixed with three tablespoons of water. This substitution will keep the dough moist and provide a similar binding effect.
Vanilla extract is a subtle but powerful flavor enhancer that rounds out the buttery notes. If you prefer a different flavor, try almond extract for a nutty twist or orange zest for a citrusy brightness. Just remember to keep the amount to one teaspoon to avoid overpowering the dough.
The Final Flourish
Powdered sugar is used for dusting, adding a sweet finish and a subtle crunch. If you prefer a less sweet version, you can replace powdered sugar with a light dusting of sea salt, which will balance the buttery richness. The key is to sprinkle it lightly before the pastries cool completely.
The filling—made from softened butter, brown sugar, and cinnamon—creates a caramelized center that oozes out when you bite into the pastry. If you’re looking for a different flavor profile, swap the cinnamon for nutmeg or add a splash of maple syrup for a deeper sweetness. The filling should be spread thinly to ensure it melts beautifully inside the pastry.
Everything’s prepped? Good. Let’s get into the real action. The next steps will transform these ingredients into a pastry that’s both visually stunning and flavorfully irresistible.
The Method — Step by Step
- Step 1: Prepare the Dough
In a large bowl, combine 4 cups of all‑purpose flour, 1 tablespoon of sugar, and 1 teaspoon of salt. Mix until evenly distributed. Add the cold butter cubes and use a pastry cutter or your fingertips to cut the butter into the flour until the mixture resembles coarse crumbs. This is the first layer that will create the flaky texture. Keep the dough cold until the next step. - Step 2: Activate the Yeast
In a separate bowl, whisk 1 cup of warm milk with 1 teaspoon of sugar and 2 1/4 teaspoons of active dry yeast. Let it sit for 5 minutes until it becomes frothy, indicating the yeast is active. If the mixture doesn’t froth, the yeast is likely dead and should be replaced. This frothy mixture will give the dough a light, airy rise. - Step 3: Combine and Knead
Pour the yeast mixture into the flour mixture and stir with a wooden spoon until the dough begins to pull together. Transfer the dough onto a lightly floured surface and knead for about 5 minutes until it becomes smooth and elastic. If the dough feels sticky, add a tablespoon of flour at a time. The goal is a pliable dough that holds its shape. - Step 4: First Rise
Place the dough in a greased bowl, cover with a damp cloth, and let it rise in a warm spot for 1 hour or until it has doubled in size. This first rise is crucial for developing flavor and structure. The dough should feel airy and slightly springy when pressed lightly. Keep an eye on it; if it over‑rises, you’ll get a flat pastry. - Step 5: Roll and Layer
Punch down the dough to release excess gas. Roll it out into a rectangle about 12 inches by 8 inches. Place a sheet of parchment paper on top, then fold the dough into thirds, like a letter. Rotate the dough 90 degrees, roll again, and fold into thirds once more. This lamination process creates the flaky layers. Chill the dough for 30 minutes before proceeding. - Step 6: Shape the Cruffins
Remove the dough from the fridge and cut it into 4 equal squares. Roll each square into a tight spiral, starting from one corner and winding toward the center. The spiral shape is what gives the cruffins their iconic look. Place each spiral on a parchment‑lined baking sheet, leaving a small space between them. - Step 7: Second Rise
Cover the shaped dough lightly with a kitchen towel and let it rise for 30 minutes. During this time, the dough will puff up slightly, creating that airy interior. Keep the temperature steady; too cold will stall the rise, too hot will cause the dough to over‑rise and collapse. - Step 8: Bake
Preheat your oven to 375°F (190°C). Brush the tops of the cruffins with a beaten egg to give them a shiny finish. Bake for 20–25 minutes or until they are golden brown and the tops have a slight sheen. The scent of butter and vanilla will fill the kitchen, creating a cozy atmosphere. Let them cool on a rack for 5 minutes before dusting with powdered sugar.
That's it — you did it. But hold on, I've got a few more tricks that'll take this to another level. These insider tips will help you master the technique and avoid common pitfalls, ensuring every batch is flawless.
Insider Tricks for Flawless Results
The Temperature Rule Nobody Follows
Many bakers assume that room temperature is perfect for dough rises, but the truth is that a warm, draft‑free environment is essential. Place the dough near a warm oven or a sunny windowsill, but avoid direct heat. This subtle difference can mean the difference between a dense pastry and a light, airy one. I once baked a batch in a chilly kitchen and the dough didn’t rise at all, which was a disaster. Keep the dough warm, and the yeast will do its job.
Why Your Nose Knows Best
Trust your sense of smell. If the dough starts to smell slightly yeasty or buttery, it’s a sign that the fermentation is underway. A strong, pleasant aroma means the dough is ready to move to the next step. If you don’t smell anything, the dough might need more time. This simple cue saves you from rushing and ruining the texture.
The 5‑Minute Rest That Changes Everything
After shaping the cruffins, let them rest for exactly five minutes before baking. This brief pause allows the gluten to relax, which helps the pastries rise evenly. I once skipped this step, and the pastries collapsed halfway through baking. That’s why I always set a timer for five minutes. It’s a small detail with a huge payoff.
The Brush of Brilliance
An egg wash is more than just a shiny finish; it also helps the powdered sugar adhere better. Beat one egg with a tablespoon of water and brush it lightly over the tops before baking. The result is a glossy, golden crust that’s a visual feast. I’ve seen people ask me how to get that shine, and this trick is the answer.
The Secret Ingredient Swap
If you’re looking to reduce carbs, swap all‑purpose flour for almond flour. The dough will be denser, but the flavor will remain buttery and rich. Keep in mind that almond flour doesn’t absorb as much liquid, so you may need to adjust the milk slightly. This swap is a game‑changer for those on a low‑carb diet.
Creative Twists and Variations
This recipe is a playground. Here are some of my favorite ways to switch things up: Chocolate Cruffins replace the cinnamon in the filling with cocoa powder and add chocolate chips to the dough. Apple Cinnamon Cruffins fold diced apples and a pinch of nutmeg into the dough for a seasonal twist. Savory Herb Cruffins swap the sweet filling for a mixture of herbs, cheese, and a dash of smoked paprika. Nutella Cruffins drizzle Nutella over the cooled pastries for a decadent treat. Espresso Cruffins add a tablespoon of instant espresso powder to the dough for a coffee‑infused flavor. Maple Bacon Cruffins incorporate bits of crispy bacon into the filling for a sweet‑savory combination.
Storing and Bringing It Back to Life
Fridge Storage
Store uncooked cruffins in an airtight container in the refrigerator for up to 48 hours. Keep them on a paper towel to absorb excess moisture, which keeps the dough from becoming soggy. When you’re ready to bake, let them come to room temperature for 15 minutes before baking to ensure even cooking. This method preserves freshness and flavor.
Freezer Friendly
Freeze uncooked cruffins on a parchment‑lined tray for up to 3 months. Once frozen, transfer them to a freezer bag to keep them dry. When you’re ready to bake, skip the second rise and bake directly from the freezer, adding 5 minutes to the baking time. The result is a perfectly flaky pastry with a fresh taste.
Best Reheating Method
Reheat cruffins in a 350°F oven for 5–7 minutes, brushing with a splash of water before baking to re‑hydrate the dough. This trick steams the pastry back to perfection, restoring that buttery crunch and soft interior. If you’re in a hurry, microwave for 20–30 seconds, but be careful not to over‑cook; the pastry can become rubbery.