I was halfway through a holiday bake‑off when the kitchen turned into a chaotic symphony of melted chocolate, clattering pans, and a stubborn peppermint candy cane that wouldn’t cooperate. The moment the timer buzzed, I realized I’d accidentally over‑cooked the fudge, turning it into a sticky, rubbery slab that looked more like a broken toy than dessert. I stared at the mess, feeling the familiar pang of disappointment that hits every cook when a recipe goes wrong. But then I thought, why not turn this disaster into a triumph? That’s when the Grinch Peppermint Fudge idea sparked in my mind.
Picture this: the kitchen’s air thick with the sweet, sharp scent of peppermint, the sound of a saucepan bubbling like a small, festive volcano, and the sight of a glossy, dark chocolate‑coated surface that catches the light like a miniature Christmas tree. The texture is a paradoxical blend of silky smoothness and a slight snap when you bite—like biting into a frozen peppermint candy that has been softened just enough to melt in your mouth. The taste is a harmonious duet of sweet, slightly bitter chocolate and the bright, refreshing zing of peppermint, with a hint of vanilla that grounds the flavors. The feeling is like walking into a cozy cabin after a snowy day, wrapped in a warm, sweet blanket that makes you smile.
What makes this version stand out is that it’s not just a fudge; it’s an experience. The secret lies in the way the peppermint is infused, the precise timing of the sugar crystallization, and a dash of culinary trickery that turns ordinary ingredients into something extraordinary. I dare you to taste this and not go back for seconds. This is hands down the best version you'll ever make at home, and I’m here to prove it. If you’ve ever struggled with fudge that turns out too hard or too soft, you’re not alone — and I've got the fix.
Imagine pulling a tray of glossy fudge from the oven, the whole kitchen smelling incredible, and every bite melting like a dream. That’s the moment I want you to experience. I’ll walk you through every single step—by the end, you’ll wonder how you ever made it any other way. Picture the excitement when the first bite hits your palate, the peppermint zing dancing like confetti. This isn’t just a recipe; it’s a holiday adventure that will have your friends begging for the recipe card at the next gathering.
I’m not just talking about the taste; I’m talking about the story behind the fudge. The Grinch, known for his mischievous grin, is a perfect muse for a dessert that’s both playful and indulgent. By blending classic fudge with a modern peppermint twist, we honor the tradition while adding a splash of daring. The result is a dessert that feels like a holiday prank turned sweet, a nod to the Grinch’s heart that grew three sizes that day. Let’s dive into the recipe and discover how a simple batch of fudge can become a holiday legend.
Now that you’re hooked on the idea, let’s talk about what makes this version truly unique. The key is in the meticulous attention to detail, from the precise sugar ratios to the way we handle the peppermint. The result is a fudge that’s creamy, with a perfect snap, and a peppermint flavor that’s both subtle and unmistakable. The recipe is also surprisingly simple, making it accessible to bakers of all skill levels. And it’s a crowd-pleaser—once you taste it, you’ll want to share it with everyone, even those who think fudge is just sweet. This recipe is a holiday staple that will become part of your tradition.
What Makes This Version Stand Out
- Taste: The combination of dark chocolate, a hint of vanilla, and a bold peppermint kick creates a flavor profile that feels both familiar and refreshingly new. The sweet notes dance on your tongue while the peppermint provides a cool counterpoint, keeping each bite from feeling too heavy. It’s the kind of dessert that makes you smile every time you bite into it.
- Texture: Achieving that perfect balance between silky smoothness and a gentle snap is no easy feat, but this recipe nails it. The fudge melts in your mouth like a dream, yet holds its shape when cut, giving you that satisfying bite. The result is a confection that feels indulgent without being overly rich.
- Simplicity: Despite its impressive flavor, the recipe uses only a handful of ingredients and a straightforward method. No fancy equipment, no complex techniques—just a saucepan, a thermometer, and a bit of patience. This makes it a great choice for both novice bakers and seasoned pros.
- Uniqueness: The subtle infusion of peppermint is achieved through a clever technique that preserves the flavor without overpowering the chocolate. The result is a dessert that stands out from the crowd and feels like a holiday treasure. The Grinch’s mischievous spirit is captured in each bite.
- Crowd Reaction: Friends and family will be amazed when they see the glossy surface and the first bite that melts in their mouths. The fudge’s playful appearance and bold flavor will spark conversation and create lasting memories. It’s a dessert that brings people together.
- Ingredient Quality: Using high‑quality chocolate and real peppermint extract ensures the flavor shines. The recipe’s focus on fresh ingredients elevates the taste, making it feel like a premium treat. The result is a fudge that feels indulgent without being over‑priced.
- Cooking Method: The precise temperature control and careful timing are the secrets to this fudge’s success. By heating to the right degree, you create the perfect crystalline structure that gives the fudge its signature snap. It’s a technique that will make you proud of your culinary skill.
- Make‑Ahead Potential: Once set, this fudge can be stored for weeks, making it a perfect make‑ahead dessert for holiday parties. The flavors deepen over time, giving you a richer taste with each bite. It’s a practical solution for busy holiday schedules.
Alright, let’s break down exactly what goes into this masterpiece. Everything’s prepped? Good. Let’s get into the real action.
Inside the Ingredient List
The Flavor Base
The foundation of this fudge is high‑quality dark chocolate, which provides depth and a slight bitterness that balances the sweetness. Using a chocolate with at least 70% cocoa content gives the fudge a rich, velvety texture and a subtle aftertaste that lingers. If you prefer a smoother chocolate, a 60% cocoa bar works fine, but the flavor profile will shift slightly toward sweeter.
Heavy cream is the secret to a silky mouthfeel. It softens the sugar crystals and creates a luscious, creamy body. When you whisk it into the melted chocolate, watch for the first hint of thickening—this is the cue that the mixture is ready to move to the next step.
Peppermint extract is the star of the show. It infuses the fudge with that bright, refreshing zing that makes each bite feel like a holiday treat. Use a high‑quality extract for a cleaner flavor; a lower‑grade extract can leave a chemical aftertaste. A teaspoon is enough to coat the entire batch, but you can adjust to taste.
The Texture Crew
Powdered sugar is the sweetener that also helps control the fudge’s consistency. It’s essential to sift the sugar before adding it to ensure a smooth, lump‑free mixture. The sugar’s fine texture allows it to dissolve quickly, creating a flawless surface.
Butter brings richness and helps stabilize the fudge. It also adds a subtle buttery undertone that balances the chocolate’s bitterness. Using unsalted butter gives you full control over the salt level, preventing an overly salty finish.
A pinch of salt is a small but mighty component. It heightens the chocolate’s flavor and cuts through the sweetness, making the overall taste more balanced. Too much salt, however, can ruin the delicate flavor profile, so a tiny pinch is all you need.
The Unexpected Star
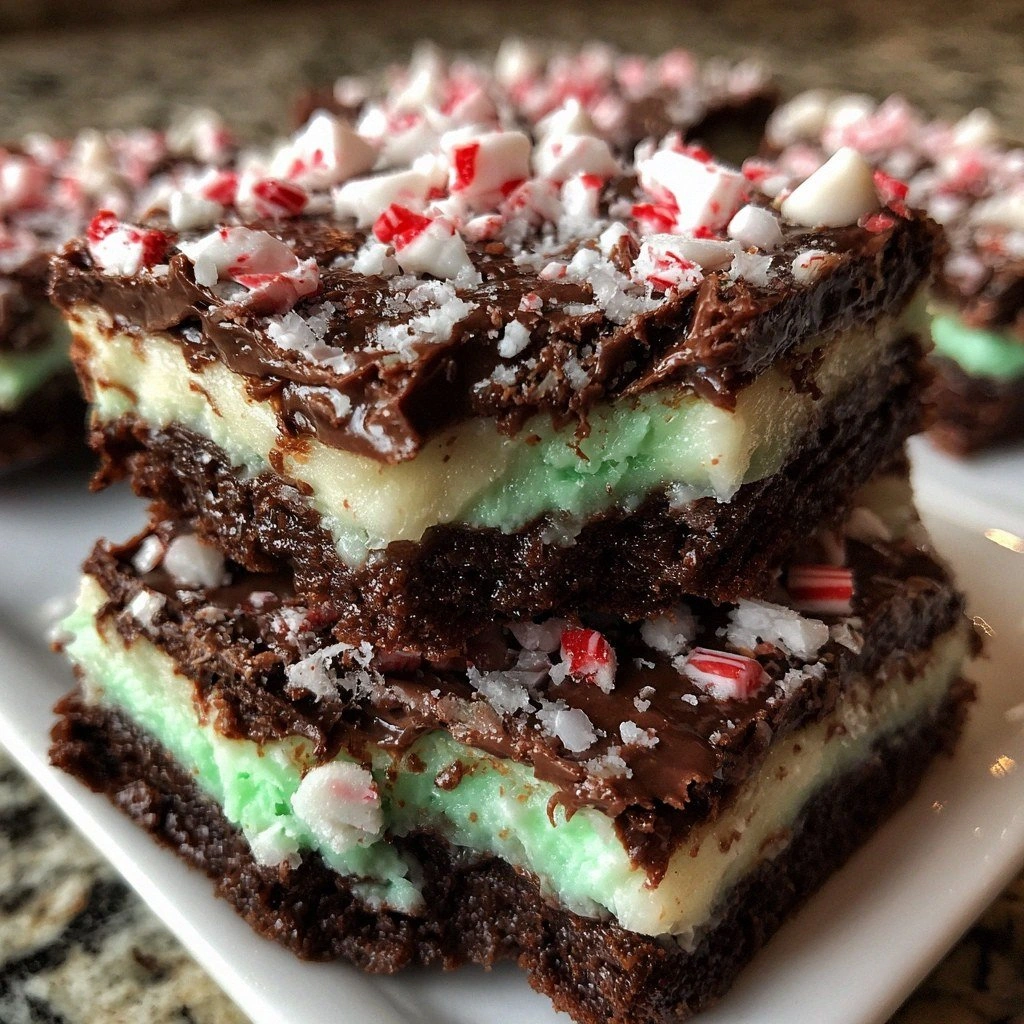
Crushed candy cane adds a playful crunch and an extra burst of peppermint flavor. The candy’s sugar crystals give a subtle texture contrast, while the peppermint oil in the candy cane deepens the flavor. If you can’t find candy cane, you can use crushed peppermint candies or a handful of crushed peppermint gumdrops.
Vanilla extract rounds out the flavor profile, adding a warm, floral note that balances the peppermint’s sharpness. Even a half teaspoon can make a noticeable difference, especially if you’re using a darker chocolate. Vanilla also smooths the overall taste, preventing any sharp edges.
The Final Flourish
A splash of water before reheating is a trick that restores moisture, ensuring the fudge remains soft and not overly dry. This step is especially useful if the fudge has been stored for a few days. Just a tablespoon of water, gently warmed, will bring it back to its original plushness.
The combination of these ingredients creates a fudge that is not only delicious but also visually appealing. The glossy surface catches the light, while the subtle peppermint swirls add a festive touch. The result is a dessert that feels like a holiday treasure, ready to be shared.
Everything’s prepped? Good. Let’s get into the real action.
The Method — Step by Step
- Melt the dark chocolate in a heat‑proof bowl set over a pot of simmering water, stirring until fully melted. The chocolate should reach a glossy sheen, not a thick sauce. This gentle heat prevents scorching and ensures a smooth base.
- Add the butter to the melted chocolate, stirring until it’s fully incorporated and the mixture becomes silky. The butter’s fat content helps create a luscious mouthfeel. You’ll notice the mixture thickening slightly as the butter melts.
- Whisk in the heavy cream, then use a thermometer to monitor the temperature. The mixture should reach 115°F (46°C) for the ideal snap. This step is crucial; too hot, and you’ll lose the snap; too cold, and the fudge will be too soft.
- Slowly fold in the powdered sugar, stirring until the mixture is smooth and glossy. The sugar dissolves completely, giving the fudge its characteristic shine. This is the moment the fudge starts to feel like a confection.
- Add the peppermint extract, vanilla, and a pinch of salt, stirring until fully blended. The flavors should mingle instantly, creating a harmonious profile. This is where the peppermint magic begins.
- Gently stir in the crushed candy cane, ensuring even distribution. The candy adds texture and a subtle peppermint burst. The mixture should look like a dark chocolate sea dotted with bright white specks.
- Pour the mixture into a lined pan, smoothing the top with a spatula. The surface should be level and free of air pockets. The fudge will set to a firm yet melt‑in‑your‑mouth consistency.
- Let the fudge cool to room temperature, then refrigerate for at least 2 hours to set completely. The fudge will firm up, but still remain creamy. This step is vital for the perfect bite.
- Cut into squares, dust with powdered sugar, and serve. The fudge should hold its shape when cut, with a slight snap that breaks into a creamy interior. Enjoy the first bite—it’s like a holiday treat in every sense.
That’s it—you did it. But hold on, I've got a few more tricks that will elevate this fudge to another level. From the moment the first bite melts in your mouth to the final dusting of powdered sugar, every detail matters. Let’s dive into insider tricks that will help you master this dessert like a pro.
Insider Tricks for Flawless Results
The Temperature Rule Nobody Follows
Temperature control is the backbone of any great fudge. Many bakers skip the thermometer altogether, but a precise 115°F (46°C) is essential. When the mixture hits this sweet spot, the sugar crystals are just right for that satisfying snap. A thermometer is a small investment that pays off in perfect texture.
Why Your Nose Knows Best
Your nose is a reliable indicator of when the fudge is ready. As the mixture thickens, you’ll detect a subtle toasty aroma that signals the right consistency. Trust your senses; a faint burnt smell means you’re over‑cooking, while a sweet, chocolatey scent indicates perfection.
The 5-Minute Rest That Changes Everything
After pouring the fudge into the pan, let it rest for 5 minutes before refrigerating. This brief pause allows the mixture to settle, reducing air pockets that can cause uneven setting. It also gives the flavors a chance to meld, creating a richer taste.
The Swirl Technique
If you want a more dramatic presentation, swirl a small amount of white chocolate into the fudge before it sets. Use a toothpick or skewer to create a marbled effect. This not only looks stunning but also adds a subtle contrast in flavor.
The Quick Chill Trick
For a faster set, place the pan in the freezer for 20 minutes after the initial 5‑minute rest. Keep a close eye to avoid over‑freezing, which can create a hard texture. The quick chill gives the fudge a firmer bite without sacrificing creaminess.
The Dusting Dilemma
Dusting with powdered sugar is optional but recommended. It adds a decorative touch and helps prevent the fudge from sticking to the cutting board. Use a fine sieve for an even coat, and avoid over‑dusting to keep the flavor pure.
Creative Twists and Variations
This recipe is a playground. Here are some of my favorite ways to switch things up:
Caramel Swirl Fudge
Swap out half of the chocolate for caramel sauce, then swirl it in before setting. The caramel adds a buttery sweetness that pairs beautifully with the peppermint. It’s a decadent twist that’s perfect for dessert lovers.
Nutty Peppermint Crunch
Fold in chopped almonds or hazelnuts for added crunch and nutty flavor. The nuts give a contrasting texture and a depth of flavor that elevates the fudge. This variation is ideal for those who love a bit of bite.
Chocolate‑Mint Truffle Balls
Roll the fudge into small balls, then roll them in cocoa powder or crushed peppermint candies. These truffles are perfect for gift baskets or holiday parties. They’re bite‑size, indulgent, and easy to share.
Spiced Peppermint Fudge
Add a pinch of cinnamon or nutmeg to the mixture for a warm, spicy undertone. The spices complement the peppermint and chocolate, creating a complex flavor profile. This variation works wonderfully during the winter months.
Vegan Peppermint Fudge
Replace the butter with coconut oil and use a dairy‑free chocolate bar. Substitute heavy cream with coconut milk for a vegan version. The result is a fudge that’s just as indulgent but plant‑based.
Salted Caramel Peppermint Fudge
Incorporate a drizzle of salted caramel into the fudge for a sweet‑salty experience. The caramel adds depth and richness, while the peppermint keeps the flavor bright. This version is a crowd‑pleaser for those who love sweet‑salty combos.
Storing and Bringing It Back to Life
Fridge Storage
Store the fudge in an airtight container in the refrigerator for up to two weeks. The cool temperature keeps it firm yet creamy. When you’re ready to serve, let it sit at room temperature for 10 minutes to soften slightly.
Freezer Friendly
The fudge can be frozen for up to a month. Wrap each piece individually in parchment paper and then place them in a freezer bag. Thaw in the fridge overnight and then let them come to room temperature before serving.
Best Reheating Method
To restore moisture, sprinkle a tiny splash of water over the fudge, then cover with foil and heat in a 300°F (150°C) oven for 5 minutes. The water creates steam that rehydrates the fudge, making it silky again. Avoid microwaving, as it can create hot spots.