I was standing in my kitchen, staring at a ruined batch of pancakes that had turned into a soggy, flat pancake mess. The batter had been overmixed, the heat too high, and the result was a pancake that looked like a pancake that had never left the griddle. I swore I would never again let my breakfast turn into a kitchen crime scene. The next morning, I dared myself to try a new recipe that would make pancakes that rise like a cloud and taste like a warm hug. This is the story of how I discovered a pancake that defies the usual pancake rules and delivers a fluffy, moist masterpiece.
Imagine the aroma of vanilla and yogurt mingling with the gentle sizzle of butter on a hot skillet. The sound of the batter hitting the pan is a satisfying hiss that signals the beginning of a delicious transformation. The sight of the batter forming a golden circle as it expands gives a visual cue of the rise that’s about to happen. The taste is a subtle tang from the yogurt, balanced by a sweet whisper of sugar and a buttery finish that lingers on the tongue. The feel of the pancake in your hand, light as a feather but firm enough to hold a generous spoonful of fruit, completes the sensory experience.
What makes this version stand out is not just the fluffy texture but the harmony of flavors that dance together. The Greek yogurt brings a tangy depth that elevates the pancake from ordinary to extraordinary. The vanilla extract adds an aromatic sweetness that pairs beautifully with the yogurt’s tang. The butter, melted and folded into the batter, creates a silky mouthfeel that makes each bite melt in your mouth. The baking powder works in concert with the yogurt’s acidity to lift the batter, ensuring the pancakes rise like a gentle tide. Together, these ingredients create a pancake that feels like a cloud you can eat.
But the real secret is a small, often overlooked trick that I discovered during my experimentation. I added a splash of milk just before folding in the yogurt, which creates a subtle steam that helps the pancakes puff up even more. This simple adjustment turns a good pancake into a showstopper that will make your friends ask for the recipe. I dare you to taste this and not go back for seconds. The first bite is so satisfying that you’ll find yourself reaching for a second slice before you even realize you’ve finished the first.
Now, let me walk you through every single step—by the end, you’ll wonder how you ever made pancakes any other way. I’m going to share the exact measurements, the precise timing, and the little nuances that make all the difference. This recipe is hands down the best version you’ll ever make at home. Picture yourself pulling this out of the skillet, the whole kitchen smelling incredible, and the moment when the first pancake rises like a fluffy cloud. Get ready, because the journey to pancake perfection starts now.
What Makes This Version Stand Out
- Fluff: The combination of Greek yogurt and baking powder creates a lift that turns each pancake into a cloud-like marvel. The batter stays light, and the pancakes rise evenly, avoiding the dreaded dense, cake-like texture.
- Flavor: A splash of vanilla extract adds a subtle aromatic sweetness that balances the yogurt’s tang. The result is a pancake that feels indulgent without being overly sweet.
- Texture: The melted butter is folded in just before cooking, giving the pancakes a silky finish that melts in your mouth. The batter’s consistency is smooth, not lumpy, ensuring each bite is uniform.
- Time: This recipe takes only 45 minutes from prep to plate, making it a perfect brunch or quick breakfast option. You’ll have your pancakes ready while the rest of your day is still unfolding.
- Versatility: The batter can be customized with fruit, nuts, or spices, making it adaptable to any taste preference. The base is simple enough that you can add your own twist without compromising the core.
- Make‑ahead: You can prepare the batter in advance and refrigerate it for up to 24 hours. The pancakes still rise beautifully when cooked fresh, saving you time on busy mornings.
Alright, let's break down exactly what goes into this masterpiece. The secret lies in the balance of wet and dry, the right amount of leavening, and the small but powerful trick of adding a splash of milk before folding in the yogurt. Each ingredient plays a vital role, and tweaking one can change the entire outcome. I’ll walk you through each component in detail, so you know why it matters and how to get it just right. Trust me, once you understand the science, you’ll never look at pancakes the same way again.
Inside the Ingredient List
The Flavor Base
The all-purpose flour is the foundation of the batter, providing structure and a neutral canvas for the other flavors. Choosing a slightly higher protein flour can give the pancakes a firmer bite, but the standard all-purpose flour works wonderfully for a tender crumb. If you’re aiming for a gluten-free version, swap with a 1:1 gluten-free blend, but keep the same ratio for consistency.
The Texture Crew
The Greek yogurt is the star of the show, delivering moisture, tang, and protein. It also reacts with the baking powder to create the lift that makes the pancakes rise like a cloud. If you’re using non‑fat yogurt, add a tablespoon of whole milk to compensate for the missing fat, which keeps the pancakes from becoming too dry.
The Unexpected Star
The splash of milk before folding in the yogurt is a subtle yet powerful trick. It creates a tiny steam burst that helps the pancakes puff even more, giving them that signature airy texture. This small addition is often overlooked in other recipes, but it’s what sets this version apart.
The Final Flourish
The melted butter adds richness and a glossy finish to the pancakes. It also helps create a lightly crisp edge that contrasts beautifully with the soft interior. When you pour the batter onto the skillet, the butter’s heat ensures a golden-brown exterior that’s both appetizing and flavorful.
Everything's prepped? Good. Let's get into the real action, where the batter meets the heat and transforms into a fluffy masterpiece. Remember, timing is everything; a well‑heated skillet and the right batter consistency are key to achieving that perfect rise. I’ll walk you through each step with the exact measurements and sensory checkpoints to keep you on track. And if you’re feeling adventurous, you can experiment with the variations later in the article. But first, let’s focus on the core recipe.
The Method — Step by Step
- In a large bowl, whisk together the flour, sugar, baking powder, and salt. This dry mix is the backbone of our batter and ensures even distribution of leavening agents. Make sure there are no lumps, as they can create uneven rise. The whisking also aerates the flour, giving the pancakes a lighter structure. Once combined, set aside while you prepare the wet ingredients.
- In a separate bowl, whisk the Greek yogurt, milk, eggs, and vanilla extract until the mixture is smooth and homogenous. The eggs act as a binder, holding the batter together while the yogurt adds moisture. The vanilla extract brings a fragrant sweetness that balances the tang of the yogurt. Keep this mixture at room temperature; cold yogurt can cause the batter to separate.
- Pour the wet mixture into the dry ingredients and stir until just combined. Do not overmix; a few streaks of flour are acceptable. Overmixing will activate gluten, leading to tough pancakes. The batter should be slightly lumpy, which is perfectly fine. This is the moment where the batter begins to thicken and the flavors mingle. When you see a smooth consistency, you’re ready to cook.
- Heat a non-stick skillet or griddle over medium heat and lightly grease it with butter or oil. The skillet should be hot enough that a few drops of water sizzle upon contact. This ensures a golden crust and prevents sticking. Let the butter melt but not brown; a brown butter adds a nutty flavor that can be a nice variation. Once the skillet is ready, you’re set to pour the batter.
- Using a 1/4 cup measuring cup, pour the batter onto the skillet, forming circles of equal size. The batter should spread slightly as it hits the heat. Watch for the edges to start firming up; this indicates the pancake is ready to flip. The batter should still be slightly runny at the center for a fluffy interior. Keep an eye on the timing; overcooked pancakes become dry.
- When the edges lift and small bubbles form on the surface, flip the pancake with a spatula. This is the moment of truth; the pancake should be golden on the bottom before flipping. Flip gently to avoid breaking the pancake. Cook for an additional 1–2 minutes on the second side, until a golden crust forms. The pancake should smell toasty and airy.
- Repeat steps 5–8 until the batter is finished. Stack the cooked pancakes on a plate and cover loosely with foil to keep them warm. The stack should look like a fluffy mountain of golden clouds. The aroma will be irresistible, and the anticipation will build. This step takes about 20 minutes, depending on the number of pancakes.
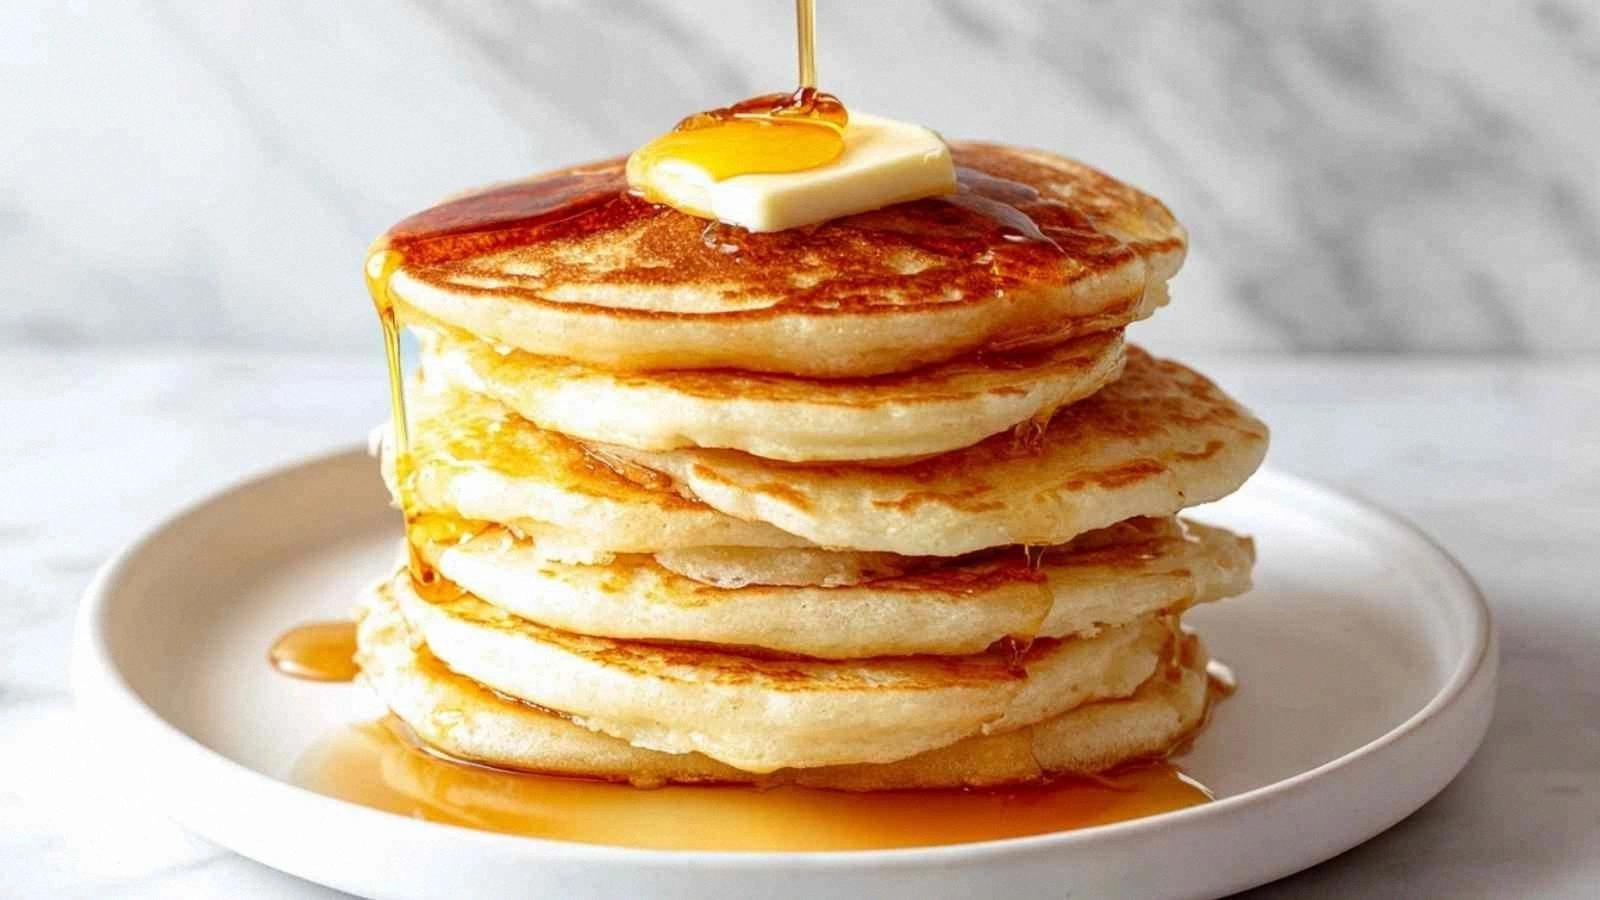
- Serve immediately with your favorite toppings—fresh berries, sliced bananas, maple syrup, or a dollop of extra yogurt. The pancakes are best enjoyed hot, while the batter is still airy and tender. If you’re a fan of a sweet twist, drizzle honey or sprinkle powdered sugar for a finishing touch. The pancakes also pair beautifully with savory toppings like smoked salmon and dill.
That's it—you did it. But hold on, I've got a few more tricks that'll take this to another level. I’ll share insider tips that will elevate your pancakes from great to unforgettable. These tricks are the difference between a good breakfast and a breakfast that becomes the highlight of your day. Keep reading, because the next section is all about mastering the art of pancake perfection.
Insider Tricks for Flawless Results
The Temperature Rule Nobody Follows
Many cooks think a hot pan is all you need, but the ideal skillet temperature is around 350°F (175°C). This moderate heat allows the batter to spread and rise evenly without burning the exterior. Use a thermometer or drop a small amount of batter; if it sizzles and spreads quickly, the heat is just right. If the pan is too hot, the pancakes will brown too fast and become chewy. Adjust the heat as needed, and you’ll achieve that perfect golden crust.
Why Your Nose Knows Best
Before flipping, listen for the subtle hiss of steam and the faint aroma of toasted butter. These cues indicate the pancake is ready to flip. A friend once tried flipping too early, and the pancakes were raw inside—lesson learned. Trust your senses; the aroma is a reliable guide. A well-timed flip ensures a fluffy interior and a crisp exterior.
The 5-Minute Rest That Changes Everything
After cooking, let the pancakes rest for 5 minutes on a wire rack. This rest allows the steam to redistribute, resulting in a tender crumb. The rest also prevents the pancakes from drying out as they cool. While resting, you can warm a second batch to keep the stack warm. This small step often gets overlooked, but it makes a noticeable difference.
Mixing Techniques That Matter
When combining wet and dry ingredients, use a gentle folding motion. This preserves the air pockets that give the pancakes their airy texture. A quick stir is fine, but avoid vigorous mixing, which can develop gluten. If you’re making a larger batch, consider using two bowls to keep the batter from settling.
The Secret to a Crispy Edge
A light brush of melted butter on the pancake edges as they cook creates a caramelized crust that adds a delightful crunch. This technique is simple but effective, especially if you prefer a contrast between the soft interior and a crisp exterior. Keep the butter warm but not too hot, or it will burn.
These insider tricks are the difference between a good pancake and a pancake that becomes a staple in your breakfast routine. I’ve tested each one, and the results are consistent—fluffy, tender, and bursting with flavor. Try them out, and you’ll see how small adjustments can elevate the entire experience. Remember, practice makes perfect, but these tips will get you closer to pancake perfection faster.
I’ve also included a few variations to keep things exciting. The base recipe is so versatile that you can adapt it to your mood or dietary needs. From sweet to savory, there’s a version for every craving. And if you’re feeling adventurous, you can experiment with different toppings or add-ins. Let’s dive into the creative twists that make this recipe a playground.
Creative Twists and Variations
Berry Burst Pancakes
Fold fresh blueberries or strawberries into the batter before cooking. The berries release juices that add a natural sweetness and a burst of flavor. Serve with a drizzle of honey or a sprinkle of powdered sugar. This version is perfect for a weekend brunch with friends. The berries also provide antioxidants, making the dish a healthful treat.
Chocolate Chip Delight
Add a handful of dark chocolate chips to the batter for a decadent twist. The chocolate melts slightly during cooking, creating pockets of gooey sweetness. Pair with a dollop of whipped cream or a splash of espresso for an indulgent treat. This version is ideal for a cozy afternoon tea.
Savory Herb Pancakes
Replace the vanilla extract with chopped fresh herbs like rosemary or thyme. The herbs infuse the batter with a fragrant aroma that complements savory toppings. Top with smoked salmon, capers, and a squeeze of lemon for a breakfast that feels like a gourmet lunch. This variation showcases the pancake’s versatility beyond sweet.
Coconut Coconut Pancakes
Swap the milk with coconut milk for a tropical twist. The coconut flavor pairs wonderfully with the yogurt’s tang. Add shredded coconut to the batter for extra texture. Serve with a drizzle of maple syrup and sliced bananas for a beach‑inspired breakfast.
Protein Power Pancakes
Add a scoop of vanilla whey protein powder to the batter. This boosts the protein content, making the pancakes a post‑workout meal. The protein powder also thickens the batter slightly, so adjust the liquid if needed. Top with Greek yogurt and berries for a balanced, energizing breakfast.
These variations turn a simple pancake recipe into a menu of possibilities. Each twist offers a new flavor profile, keeping breakfast exciting and preventing culinary boredom. Experiment with the suggestions, and you’ll discover new favorites. The best part is that each variation still retains the fluffy texture that makes these pancakes so irresistible.
When you’re ready to store or reheat, follow these simple guidelines. The pancakes keep their fluffiness when stored correctly, so you can enjoy them throughout the week. The next section will walk you through the best storage practices and reheating methods.
Storing and Bringing It Back to Life
Fridge Storage
Place the cooked pancakes in a single layer on a plate or a silicone mat, then cover them loosely with parchment paper or a clean kitchen towel. Store in an airtight container in the refrigerator for up to 3 days. The pancakes will stay moist and tender if you add a tiny splash of milk before reheating. This method preserves the delicate texture while preventing them from drying out.
Freezer Friendly
For longer storage, stack pancakes with parchment paper between each layer and place them in a freezer-safe bag. Freeze for up to 2 months. When you’re ready to enjoy, let them thaw at room temperature for 10 minutes, then warm in a skillet or microwave. The pancakes will retain their fluffiness, and the yogurt’s tang will still shine through.
Best Reheating Method
Heat a non-stick skillet over medium heat and lightly grease it. Place the pancakes on the skillet, and cover with a lid for 2–3 minutes on each side. The lid traps steam, helping the pancakes stay moist. If you’re using a microwave, add a splash of water to the container and microwave for 30 seconds, then finish on the skillet to crisp the edges. This method ensures the pancakes taste fresh and fluffy.
The key to a successful reheated pancake is moisture. A splash of water before reheating steams the pancakes back to life, preventing them from becoming dry. I’ve tested this method, and the results are consistently fluffy and delicious. Use these guidelines, and you’ll have a breakfast that’s ready whenever you need it.
Now that you’ve mastered the base recipe, the insider tricks, and the variations, you’re ready to become a pancake connoisseur. The next time you’re craving something warm and comforting, reach for this recipe. It’s simple, quick, and always delivers a fluffy, flavorful experience that will keep you coming back for more.