I remember the night I first discovered the secret to turning ordinary chicken wings into a flavor explosion. I was in a cramped apartment, the fridge was empty except for a few stale frozen nuggets, and my friends were demanding something that could satisfy a crowd and still feel homemade. I reached for a bag of pre‑seasoned wings, tossed them in a pan, and the result was… underwhelming. The wings were dry, the seasoning flat, and the entire kitchen smelled like burnt rubber. That night I swore I’d never again settle for mediocre wing fare.
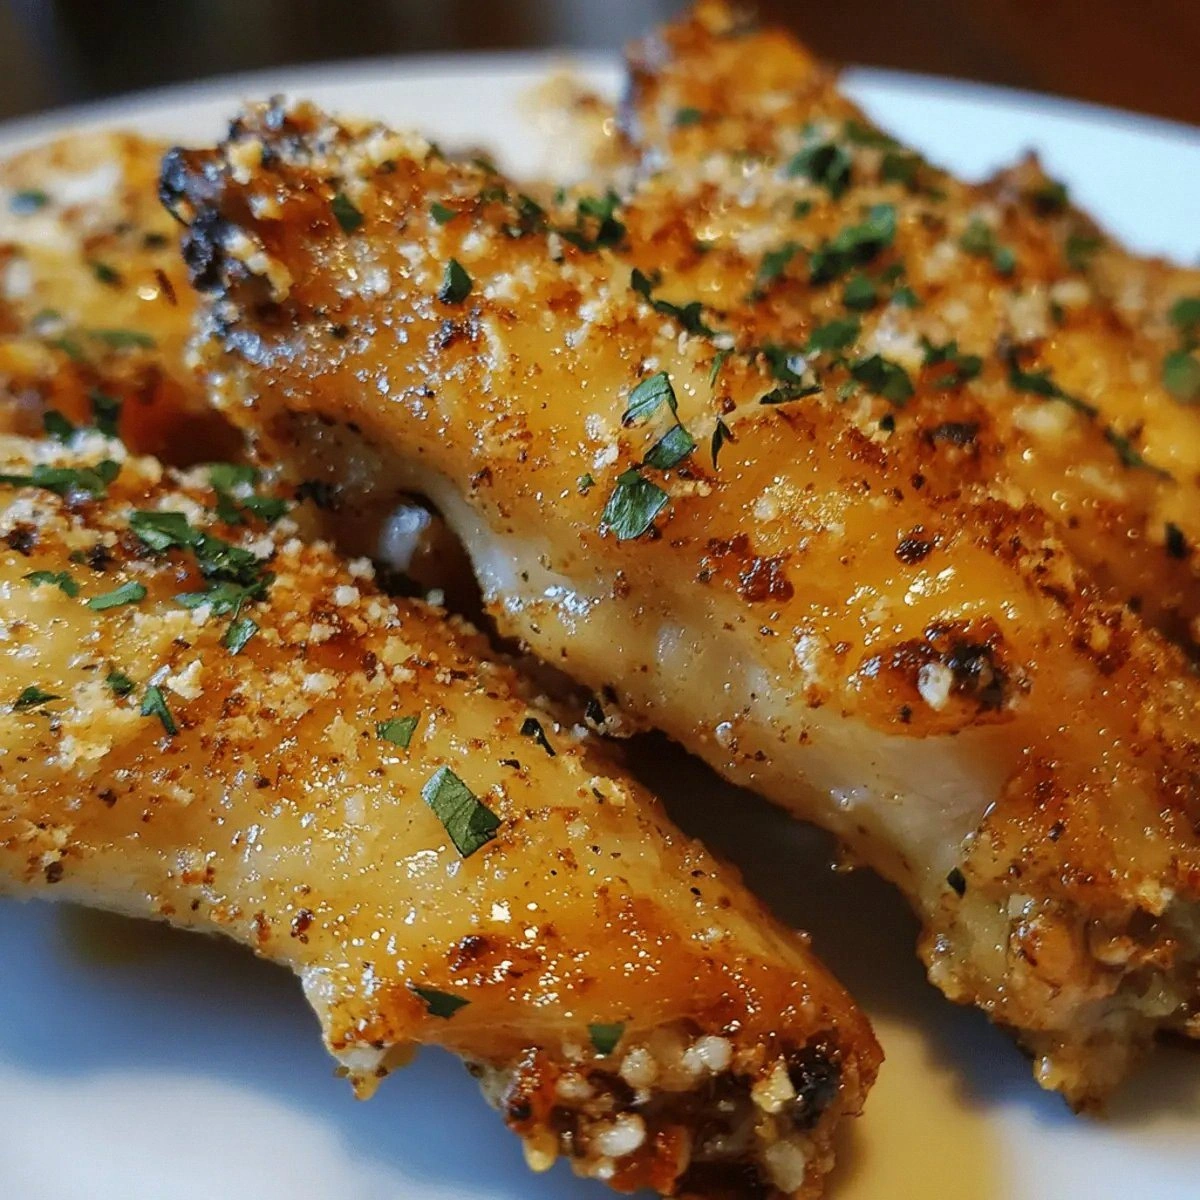
Fast forward to today, and I’m about to unveil the most effortless, yet mind‑blowing, garlic Parmesan chicken wing recipe you’ll ever taste. Picture this: golden, crisp edges that crackle like thin ice when you bite, a buttery sauce that coats each wing like velvet, and a bright lemon finish that cuts through the richness. The aroma alone—garlic sizzling in butter, parmesan melting into a glossy glaze—will have your neighbors knocking on the door for a bite before you even plate them.
What makes this version stand out is simple yet revolutionary: it marries the classic “garlic butter” technique with a Parmesan‑rich crust and a splash of lemon that keeps the wings from becoming a greasy mess. I’ve spent hours tweaking the ratio of butter to olive oil, the timing of the garlic, and the finish with fresh herbs to lock in moisture without sacrificing crunch. The result is a dish that feels indulgent but is surprisingly quick, and the flavors are so balanced that even the most seasoned wing‑connoisseurs will be impressed.
I dare you to taste this and not go back for seconds. The combination of savory, tangy, and aromatic notes will have you reaching for the sauce again and again. If you’ve ever struggled with dry, bland wings, you’re not alone—this recipe is the fix you’ve been waiting for. The secret? A buttery, garlic‑laden coating that locks in juices and a Parmesan crust that adds a nutty, salty finish.
Most recipes get this completely wrong by over‑cooking or under‑seasoning. Here’s what actually works: a short, high‑heat sear to create that perfect crisp, followed by a quick glaze that doesn’t burn. The technique I’ll show you will keep the wings moist on the inside and blistered on the outside, like a perfectly baked cookie that’s crisp on the edges.
Picture yourself pulling this out of the oven, the whole kitchen smelling incredible, the steam swirling in a golden haze. The sound of the wings crackling as they finish is music to my ears—absolute perfection. And when you take that first bite, the buttery garlic sings, the parmesan crunches, and the lemon zest lifts every flavor to the next level.
Okay, ready for the game‑changer? This next part? Pure magic. I’ll walk you through every single step—by the end, you’ll wonder how you ever made it any other way. Trust me, the end result will be a dish you’ll brag about at parties, and I’m not exaggerating. Let’s dive in.
What Makes This Version Stand Out
- Flavor: The marriage of garlic, butter, and Parmesan creates a sauce that coats the wings like velvet, delivering a savory depth that ordinary wing recipes lack.
- Texture: A quick high‑heat sear followed by a finishing glaze locks in moisture while giving the exterior a blistered, crispy finish that shatters like thin ice.
- Simplicity: With only nine ingredients, the recipe is straightforward, yet the flavor profile feels gourmet. No fancy gadgets required.
- Uniqueness: The addition of fresh lemon juice and parsley gives a bright, aromatic lift that sets this dish apart from the standard butter‑garlic wing.
- Crowd Reaction: Guests often comment on how “this is hands down the best version you’ll ever make at home.” It’s a crowd‑pleaser at any gathering.
- Ingredient Quality: Using fresh garlic, high‑quality Parmesan, and real butter elevates the dish, proving that quality ingredients can transform a simple recipe.
- Cooking Method: The two‑step cooking—first sear, then glaze—ensures even cooking and maximum flavor infusion.
- Make‑Ahead Potential: You can prepare the glaze ahead of time and reheat the wings with a quick sear, making this dish perfect for busy evenings.
Alright, let's break down exactly what goes into this masterpiece…
Inside the Ingredient List
The Flavor Base
At the heart of this dish lies the buttery garlic sauce. The butter provides a rich, creamy canvas that melts into the wings, while the olive oil adds a subtle fruity note and helps the garlic release its full aroma without scorching. The garlic itself is the star—minced finely to ensure every bite is infused with its sharp, sweet essence. If you skip garlic, you lose the signature kick that makes the wings unforgettable. For a milder version, reduce the garlic to two cloves; for a more intense bite, double the amount.
The olive oil is not just a cooking medium; it elevates the flavor profile by adding depth and a slight peppery undertone. When heated, it allows the garlic to caramelize slowly, creating a subtle nutty sweetness that balances the richness of the butter. A good rule of thumb: use a 50/50 ratio of butter to oil for the perfect balance of flavor and heat tolerance.
The salt and black pepper are the backbone of seasoning. Salt amplifies every component, while pepper adds a gentle heat that lingers on the palate. Don’t be tempted to skip the pepper—its aroma is a key player in the overall flavor tapestry. If you’re watching sodium, use a low‑sodium salt or simply reduce the quantity by half.
The Texture Crew
The wings themselves are the canvas. Fresh, high‑quality wings with the skin on provide the ideal surface for the buttery glaze to cling to. When cooked correctly, the skin becomes blistered and crisp, offering a satisfying crunch that contrasts with the tender meat inside. If you prefer a lighter version, remove the skin before cooking; the glaze will still cling, but the texture will be softer.
The butter and olive oil blend creates a glaze that thickens as it cools, forming a glossy coating that seals in juices. This coating is what gives the wings their signature buttery sheen and helps them stay moist. If you’re a fan of extra crispness, finish the wings under the broiler for a minute or two to caramelize the glaze further.
The Unexpected Star
Lemon juice is the secret ingredient that brings brightness to this dish. Its acidity cuts through the richness of butter and Parmesan, preventing the wings from feeling heavy. The lemon also adds a subtle citrus aroma that elevates the overall sensory experience. If you’re looking for a twist, try adding a teaspoon of lemon zest for an extra burst of citrus flavor.
The Final Flourish
Fresh parsley is the final touch—its bright green color and herbaceous flavor add a fresh finish that balances the savory elements. It also provides a pop of color that makes the dish look as good as it tastes. If you’re out of parsley, a pinch of dried oregano or basil can work, but the fresh herb is the best option for maximum freshness.
Everything's prepped? Good. Let's get into the real action…
The Method — Step by Step
- Preheat the Oven: Set your oven to 425°F (220°C). A high temperature is essential for crisping the skin while keeping the meat juicy. Let the oven preheat for at least 10 minutes before you start cooking.
- Prepare the Wings: Pat the wings dry with paper towels—moisture is the enemy of crispiness. Toss them in a bowl with 1 teaspoon of salt and 1 teaspoon of black pepper, ensuring an even coating. If you like a bit of heat, sprinkle a pinch of cayenne pepper on top.
- Seared Skin: Heat a large skillet over medium‑high heat and add 2 tablespoons of olive oil. Once the oil shimmers, add the wings skin‑side down. Sear for 4–5 minutes until the skin turns a deep golden brown and starts to blister. Flip the wings and sear the other side for 3 minutes.
- Create the Garlic Butter: While the wings sear, melt 1/2 cup of butter in a small saucepan over low heat. Add the minced garlic and sauté for 1–2 minutes until fragrant, being careful not to burn it. Stir in 1 tablespoon of lemon juice and a pinch of salt.
- Glaze the Wings: Once the wings are seared, transfer them to a baking sheet lined with parchment paper. Brush each wing generously with the garlic butter glaze, making sure the coating is thick and even. The glaze should coat the wings like a glossy film.
- Add Parmesan: Sprinkle 1 cup of grated Parmesan over the glazed wings. The cheese will melt and form a golden crust that adds a nutty, salty finish. If you prefer a thicker crust, add a second light dusting.
- Bake to Perfection: Place the baking sheet in the preheated oven. Bake for 12–15 minutes, then flip the wings and bake for an additional 10–12 minutes. The wings should be blistered, golden, and the cheese crust should be slightly caramelized.
- Finishing Touches: Once baked, remove the wings from the oven and let them rest for 3 minutes. This allows the juices to redistribute and the cheese crust to set. Sprinkle fresh parsley over the top for a burst of color and freshness.
- Serve Immediately: Plate the wings on a large platter, garnish with extra parsley if desired, and serve hot. Pair them with a side of creamy ranch or a tangy blue‑cheese dip for a complete wing experience.
That's it — you did it. But hold on, I've got a few more tricks that'll take this to another level…
Insider Tricks for Flawless Results
The Temperature Rule Nobody Follows
Many wing recipes cook at 350°F, which can leave the skin soggy. By baking at 425°F, you create a hot, dry environment that crisps the skin in minutes. The high heat also caramelizes the Parmesan crust, giving it that irresistible golden color. Remember, the oven’s temperature is the single most important factor in wing texture.
Why Your Nose Knows Best
The aroma of garlic sizzling in butter is the ultimate indicator that the glaze is ready. When the garlic releases a sweet, nutty scent, you know the butter has absorbed enough flavor. If you’re unsure, give the pan a quick stir and watch for a golden brown hue at the bottom.
The 5-Minute Rest That Changes Everything
After baking, let the wings rest for at least five minutes. This short pause allows the juices to redistribute, preventing them from spilling out when you bite. The resting period also lets the Parmesan crust firm up, so it doesn’t melt away on the plate.
The Double‑Glaze Technique
For an extra buttery finish, brush a second thin layer of the garlic butter glaze after the wings come out of the oven. This second coat will melt into the cheese crust, creating a glossy, flavorful sheen that looks as good as it tastes.
The Fresh Herb Trick
Fresh parsley isn’t just a garnish; it adds a bright, peppery note that cuts through the richness. If you’re out of parsley, try a handful of fresh basil or a sprinkle of thyme. The key is to add the herbs after baking to preserve their fresh flavor.
Creative Twists and Variations
This recipe is a playground. Here are some of my favorite ways to switch things up:
Spicy Sriracha Parmesan
Add 1 tablespoon of Sriracha to the garlic butter glaze for a fiery kick. The heat pairs beautifully with the salty Parmesan, creating a flavor profile reminiscent of Korean fried chicken.
Honey Mustard Glaze
Replace the lemon juice with 2 tablespoons of honey and 1 tablespoon of Dijon mustard. The sweetness balances the richness, while the mustard adds a subtle tang that complements the Parmesan.
Herb‑Infused Olive Oil
Infuse the olive oil with rosemary and thyme before searing. The herbal aroma will seep into the wings, adding depth without overwhelming the garlic.
Citrus Zest Finale
Finish the wings with a generous sprinkle of orange zest after baking. The citrus aroma will brighten the dish, making it feel fresh and summery.
Smoked Paprika Crunch
Dust the wings with smoked paprika before baking. The smoky flavor adds complexity, while the paprika’s slight heat provides a subtle contrast to the buttery glaze.
Truffle Parmesan Upgrade
Stir a teaspoon of truffle oil into the garlic butter glaze for an indulgent, earthy finish. The truffle flavor pairs exquisitely with Parmesan, creating a luxurious wing experience.
Storing and Bringing It Back to Life
Fridge Storage
Cool the wings completely, then place them in an airtight container or a resealable plastic bag. Store in the refrigerator for up to 3 days. The crispy texture may soften slightly, but a quick reheat will restore crunch.
Freezer Friendly
For longer storage, wrap the wings tightly in plastic wrap and then place them in a freezer bag. Freeze for up to 2 months. When ready to eat, thaw overnight in the fridge before reheating.
Best Reheating Method
Preheat your oven to 375°F (190°C). Spread the wings on a baking sheet and bake for 10 minutes, or until the cheese crust is golden and the wings are heated through. Add a splash of water before reheating to keep the wings moist, then let them steam for a few seconds before finishing in the oven to crisp the skin.