I was about to toss my pantry into chaos when a single, stubborn bag of Cheerios decided to revolt. The cereal, once a humble breakfast staple, had been sitting in the cupboard for months, its crunchy exterior now a dusty relic. I stared at the box, feeling the weight of culinary mediocrity, and thought, “If I could turn this into something worth bragging about, I’d never look back.” That moment sparked a daring experiment, a recipe that would transform the ordinary into the extraordinary. The result? Cinnamon‑buttered Cheerios, a snack that sings with caramelized sweetness, buttery richness, and the comforting crunch of toasted cereal.
Picture the scene: a warm kitchen, the scent of butter sizzling in a skillet, the gentle clink of Cheerios as they hit the pan. The air fills with a golden, nutty aroma that makes your stomach growl in anticipation. As the butter melts, it coats each cornflake, turning them into tiny, glossy soldiers ready for battle. The sizzle that follows is the soundtrack of transformation, a subtle hiss that promises a crisp, caramelized finish. With every stir, the mixture thickens, and the kitchen becomes a laboratory where simple ingredients become culinary gold.
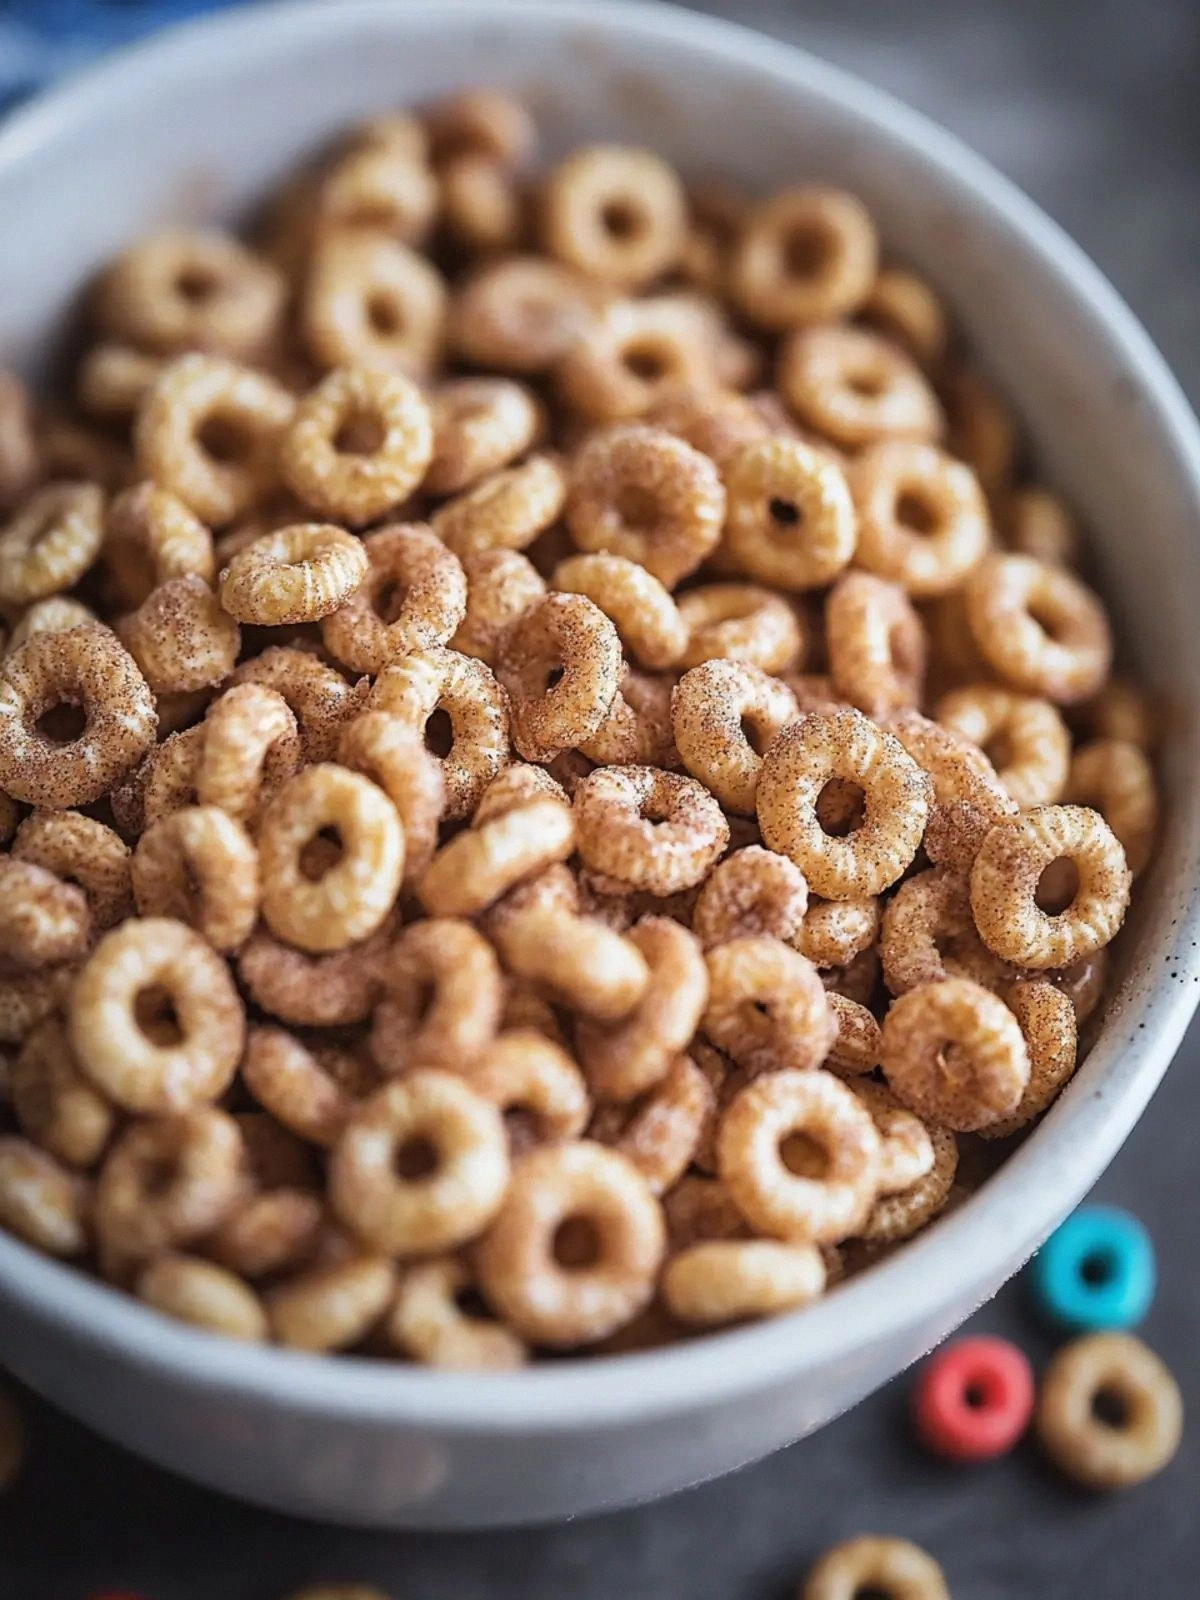
What makes this version stand out is not just the blend of flavors, but the meticulous balance of textures and the sheer audacity of the technique. I dared to use real butter instead of butter flavoring, allowing the natural fat to melt and coat the cereal in a velvety sheen. I added a generous pinch of cinnamon, turning the sweet into a warm, spiced embrace. The chocolate chips and dried fruits are introduced at the right moment, ensuring they don't melt into a gooey mess but instead provide bursts of flavor that dance on the tongue. The nuts give a satisfying crunch that contrasts with the soft, caramelized Cheerios. All of this is wrapped in a single, easy-to-follow process that feels like a secret family recipe rather than a modern kitchen hack.
And here’s the kicker: I used a simple, no‑fuss skillet method that keeps the process fast and the cleanup minimal. The entire recipe takes less than 30 minutes from start to finish, making it perfect for a quick snack or a last‑minute party treat. The secret lies in the timing—stirring the cereal just enough to coat it, then letting it bake until the edges crisp but the center remains tender. The result is a snack that feels indulgent yet wholesome, a perfect balance between sweet and savory.
I dare you to taste this and not go back for seconds. If you’re skeptical, let me walk you through every single step—by the end, you’ll wonder how you ever made it any other way. The moment you bite into the first cluster, the buttery crunch will melt into a caramelized glaze that coats your palate like velvet. The chocolate chips will pop with a subtle, bittersweet kiss, while the dried fruit provides a chewy counterpoint. This isn’t just a snack; it’s an experience that will linger in your memory long after the last bite.
When I first made this batch, I could hear the faint sigh of disappointment as a neighbor’s dog sniffed at the crumbs. I laughed, realizing that even the most ordinary pantry item can become a culinary triumph with the right touch of creativity. The aroma of toasted cereal filled the kitchen, drawing everyone in like a magnet. We gathered around the countertop, each of us eager to taste the crunchy, buttery masterpiece. The first spoonful was a revelation—sweet, spicy, and utterly satisfying. It was a moment of pure culinary joy, and I knew this recipe would become a staple in my household.
Most recipes get this completely wrong. They either overcook the cereal until it’s brittle or undercook it, leaving it soggy. I’ve seen countless attempts that end up with a mushy, unappetizing mess. But this version? It’s a game changer. The careful balance of butter, sugar, and cinnamon creates a caramelized coating that protects the cereal from becoming soggy. The chocolate chips and dried fruits are added at the right time to preserve their texture and flavor. The result is a snack that’s crisp, chewy, and utterly addictive.
Picture yourself pulling this out of the oven, the whole kitchen smelling incredible, and the aroma of butter and cinnamon drifting through the air. The sizzling sound of the last batch cooling on the counter is a symphony of culinary triumph. The first bite is a burst of buttery sweetness, followed by the crunch of toasted cereal and the subtle pop of chocolate chips. It’s a snack that feels indulgent yet wholesome, a perfect balance between sweet and savory. And the best part? It’s ready in under 30 minutes, making it perfect for a quick snack or a last‑minute party treat.
And now the fun part. I’ll be honest—I ate half the batch before anyone else got to try it. The temptation was real, the texture irresistible. But don’t worry, I’ve got the fix. If you’re worried about running out, simply double the batch and store the extra in an airtight container. The flavors will only deepen, and you’ll have a stash of snack gold ready to go whenever you need it.
Okay, ready for the game‑changer? This next part? Pure magic. The secret to a perfect crunch is in the timing. If you stir too long, the butter will separate, and you’ll end up with a greasy mess. If you stir too little, the cereal will stay dry and uncoated. The sweet spot is right when the butter starts to bubble and the Cheerios turn a light golden brown. That’s when the caramelization begins, and the flavor kicks in. Trust me, it’s a delicate dance that pays off in every bite.
If you’ve ever struggled with this, you’re not alone—and I’ve got the fix. The trick is to use a non‑stick skillet and a low‑to‑medium heat. Keep the heat steady, and stir constantly. The butter should melt into a silky liquid that coats each cornflake. The sugar will dissolve, and the cinnamon will release its warm, spicy aroma. Once the cereal is evenly coated, it’s time to add the chocolate chips and dried fruit. Don’t wait too long, or they’ll lose their texture. The result? A snack that’s sweet, spicy, and utterly addictive.
What Makes This Version Stand Out
- Flavor: The combination of butter, sugar, and cinnamon creates a caramelized glaze that coats each Cheerios, turning them into a sweet, buttery treat that’s both comforting and indulgent.
- Texture: The careful balance of toasted cereal, crunchy nuts, chewy dried fruit, and chocolate chips offers a multi‑layered mouthfeel that keeps every bite exciting.
- Speed: The entire process takes less than 30 minutes, making it ideal for a quick snack, a last‑minute party treat, or a comforting bedtime munch.
- Versatility: You can swap out ingredients—use almond butter, add coconut flakes, or experiment with different nuts—to create your own signature version.
- Make‑ahead: The snack can be stored in an airtight container for up to a week, making it a convenient grab‑and‑go option.
- Kid‑Friendly: The sweet, buttery flavor and fun textures make it a hit with kids and adults alike, turning snack time into a delightful adventure.
Alright, let's break down exactly what goes into this masterpiece...
Inside the Ingredient List
The Flavor Base
Cheerios are the backbone of this snack, providing the familiar crunch that we all love. They absorb the butter and sugar, turning into a caramelized, golden coating that melts in your mouth. If you skip Cheerios, you lose that iconic cereal texture and the entire snack loses its identity. For an extra twist, try using whole‑grain or gluten‑free Cheerios to add a subtle nutty flavor.
Butter is the secret weapon that binds everything together. It melts into a silky coating that gives the cereal its buttery richness. The fat content also helps carry the sugar and cinnamon, creating a glossy glaze that’s impossible to resist. If you’re dairy‑free, try coconut oil or a vegan butter substitute; the result is almost identical, though the flavor will be slightly different.
Vanilla extract is a subtle but powerful flavor enhancer. It rounds out the sweetness of the sugar and complements the warmth of the cinnamon. A teaspoon is enough to bring everything together without overpowering the other flavors. If you’re in a pinch, a splash of almond or maple extract works as a delightful alternative.
Granulated sugar is the sweetener that caramelizes on the skillet, giving the snack its signature golden crust. It also helps create a slight crunch as it melts and hardens. If you prefer a lower‑sugar version, try using coconut sugar or a sugar substitute like stevia or monk fruit; just remember that the texture may change slightly.
The Texture Crew
Cinnamon is the star spice that adds depth and warmth to the snack. It pairs beautifully with the butter and sugar, creating a caramelized glaze that’s both sweet and slightly spicy. A teaspoon is enough to deliver a punch of flavor without overwhelming the other ingredients. If you’re a cinnamon lover, feel free to add a pinch more for an extra kick.
Chocolate chips bring a burst of indulgence that balances the sweet and savory. They add a gooey, melty texture that contrasts with the crunchy Cheerios. The chips also provide a subtle bitterness that cuts through the sweetness, creating a well‑rounded flavor profile. If you’re looking for a healthier option, try dark chocolate chips or a sugar‑free version.
Nuts add a satisfying crunch and a dose of healthy fats. They also bring a nutty flavor that complements the cinnamon and chocolate. Half a cup of your favorite nuts—almonds, walnuts, pecans, or cashews—works perfectly. If you’re allergic or prefer a different texture, you can substitute with seeds like pumpkin or sunflower.
Dried fruits provide chewy bursts of natural sweetness that contrast with the crisp cereal. They also add a subtle tartness that balances the richness of the butter and chocolate. Half a cup of dried cranberries, raisins, or apricots works well. If you’re watching your sugar intake, consider using dried fruit with no added sugar.
The Unexpected Star
Ground cinnamon isn’t just a spice—it’s a flavor enhancer that brings depth and warmth to the snack. Its aromatic oils mingle with the butter and sugar, creating a caramelized glaze that coats every Cheerios. The cinnamon also adds a subtle heat that balances the sweetness, making each bite a harmonious blend of flavors. If you’re a cinnamon lover, feel free to add a pinch more for an extra kick.
The Final Flourish
Chocolate chips, nuts, and dried fruits are added at the last moment to preserve their texture and flavor. They provide bursts of sweetness, crunch, and chewiness that contrast with the buttery, caramelized Cheerios. These final touches elevate the snack from a simple treat to a multi‑sensory experience that satisfies every craving. If you’re feeling adventurous, try adding a sprinkle of sea salt or a splash of espresso powder for an extra layer of complexity.
Everything's prepped? Good. Let's get into the real action...
The Method — Step by Step
- Preheat your oven to 350°F (175°C). Line a large baking sheet with parchment paper, ensuring it’s ready to receive the golden mixture. This step guarantees an even bake and prevents sticking. The oven should be fully heated before you begin the next step.
- Melt ¼ cup of butter in a large, heavy‑bottom skillet over medium heat. Watch for the butter to foamy and then clear; this indicates it’s ready. Stir occasionally to keep the butter from scorching. The aroma of butter should fill the kitchen, signaling the start of something delicious.
- Add 3 cups of Cheerios to the skillet, stirring constantly. The cereal should begin to toast, turning a light golden brown. Keep the heat steady; if it’s too high, the Cheerios will burn. The goal is a uniform coating of butter and a slight caramelization.
- Sprinkle ¼ cup of sugar, 1 tsp vanilla extract, and 1 tsp ground cinnamon over the toasted Cheerios. Stir until the sugar dissolves and the mixture smells sweet and spicy. The sugar should caramelize slightly, creating a glossy glaze. The cinnamon will release its warm aroma, adding depth.
- Remove the skillet from heat and immediately fold in ½ cup chocolate chips, ½ cup nuts, and ½ cup dried fruits. The residual heat will gently melt the chocolate chips, but not enough to ruin their shape. The nuts and dried fruit should stay crunchy and chewy, respectively.
- Spread the mixture evenly onto the prepared baking sheet. Use a spatula to press it down lightly; this ensures an even bake and prevents the top from puffing. The surface should be flat, with a uniform thickness.
- Bake for 8–10 minutes, or until the edges turn crisp and the center remains slightly soft. Watch closely; the baking time can vary slightly depending on your oven. The goal is a golden crust that’s firm enough to hold together but still slightly chewy inside.
- Remove from oven and allow to cool on the baking sheet for 5 minutes. While cooling, the mixture will set into a firm yet chewy texture. The aroma will intensify, making the kitchen smell like freshly baked cookies.
- Break the cooled mixture into clusters by hand. Store any leftovers in an airtight container at room temperature for up to a week. The clusters should hold their shape and maintain a pleasant crunch.
- If you prefer a warmer snack, reheat the clusters in a preheated oven at 300°F (150°C) for 5 minutes. This will revive the crunch without melting the chocolate. The reheat step is optional but adds a delightful twist.
That's it — you did it. But hold on, I've got a few more tricks that'll take this to another level...
Insider Tricks for Flawless Results
The Temperature Rule Nobody Follows
Many people bake at a high temperature, thinking it will make the snack crisper. In reality, a lower temperature (350°F) allows the butter to coat evenly and the sugar to caramelize slowly, creating a deeper flavor. If you’re using a convection oven, reduce the temperature by 25°F to avoid over‑browning. This trick ensures a consistent, golden crust every time.
Why Your Nose Knows Best
Before you even touch the skillet, let the aroma of butter and sugar rise. A strong, buttery scent indicates the butter is properly melted and the sugar has begun to caramelize. If the smell is faint, give it a few more minutes. Your nose is a reliable guide for perfect timing.
The 5-Minute Rest That Changes Everything
After baking, let the mixture rest on the sheet for exactly five minutes. This short pause allows the chocolate chips to set and the nuts to firm up, preventing them from sliding off. The rest also lets the sugar crust firm, giving the snack a satisfying crunch.
Don't Skip the Press
Pressing the mixture down before baking creates an even surface and prevents the top from puffing. If you skip this step, the snack may rise unevenly, resulting in a lumpy texture. Use the back of a spatula or a clean pan to press firmly.
Keep It Airtight
Store the cooled clusters in a sealed container to preserve crunch. If you notice moisture, add a slice of bread to absorb it for a few hours. The bread will keep the snack crisp without altering its flavor.
Creative Twists and Variations
This recipe is a playground. Here are some of my favorite ways to switch things up:
Nutty Crunch
Swap the standard nuts for toasted coconut flakes, giving the snack a tropical twist. The coconut adds a subtle sweetness and a chewy texture that pairs beautifully with the chocolate chips.
Spicy Cinnamon
Add a pinch of cayenne pepper to the cinnamon mixture for a subtle heat. The spicy kick contrasts with the sweet, buttery base, making each bite a surprising adventure.
Mocha Madness
Stir in a tablespoon of instant espresso powder with the vanilla. The coffee undertone deepens the chocolate flavor and adds an adult‑friendly twist.
Fruit Explosion
Replace dried fruit with fresh berries like strawberries or blueberries. The burst of juiciness adds a refreshing contrast to the crunchy, buttery base.
Almond Joy
Use almond butter instead of regular butter and add shredded coconut. This variation mimics the classic candy bar, offering a chewy, nutty experience.
Low‑Sugar Delight
Replace granulated sugar with coconut sugar or a sugar substitute. The result is a slightly caramelized snack with a lower glycemic index, perfect for those watching their sugar intake.
Storing and Bringing It Back to Life
Fridge Storage
Place the cooled clusters in an airtight container and store them in the refrigerator for up to one week. The cold environment keeps the chocolate from melting and preserves the crunch. Before serving, let them sit at room temperature for a few minutes to soften slightly.
Freezer Friendly
Wrap the clusters tightly in plastic wrap and place them in a freezer bag. They can be frozen for up to three months. When you’re ready to enjoy, pop them in the oven at 300°F for 5 minutes to revive the crunch.
Best Reheating Method
To reheat, preheat your oven to 300°F (150°C) and place the clusters on a parchment‑lined tray. Heat for 4–5 minutes, or until the chocolate is glossy and the snack is warm. A quick 30‑second microwave burst can also work, but watch closely to avoid melting the chocolate.