I was halfway through a week of bland, reheated takeout when the kitchen alarm sounded: my oven had over‑baked a batch of chicken tenders into a dry, crumbly mess that looked like a sad, burnt toast. I stared at the scorched edges, feeling the sting of disappointment that comes with every failed attempt at comfort food. That moment sparked a fierce determination to turn that disappointment into a triumph, and I dared myself to create a version so irresistible that even the most skeptical taste buds would beg for seconds.
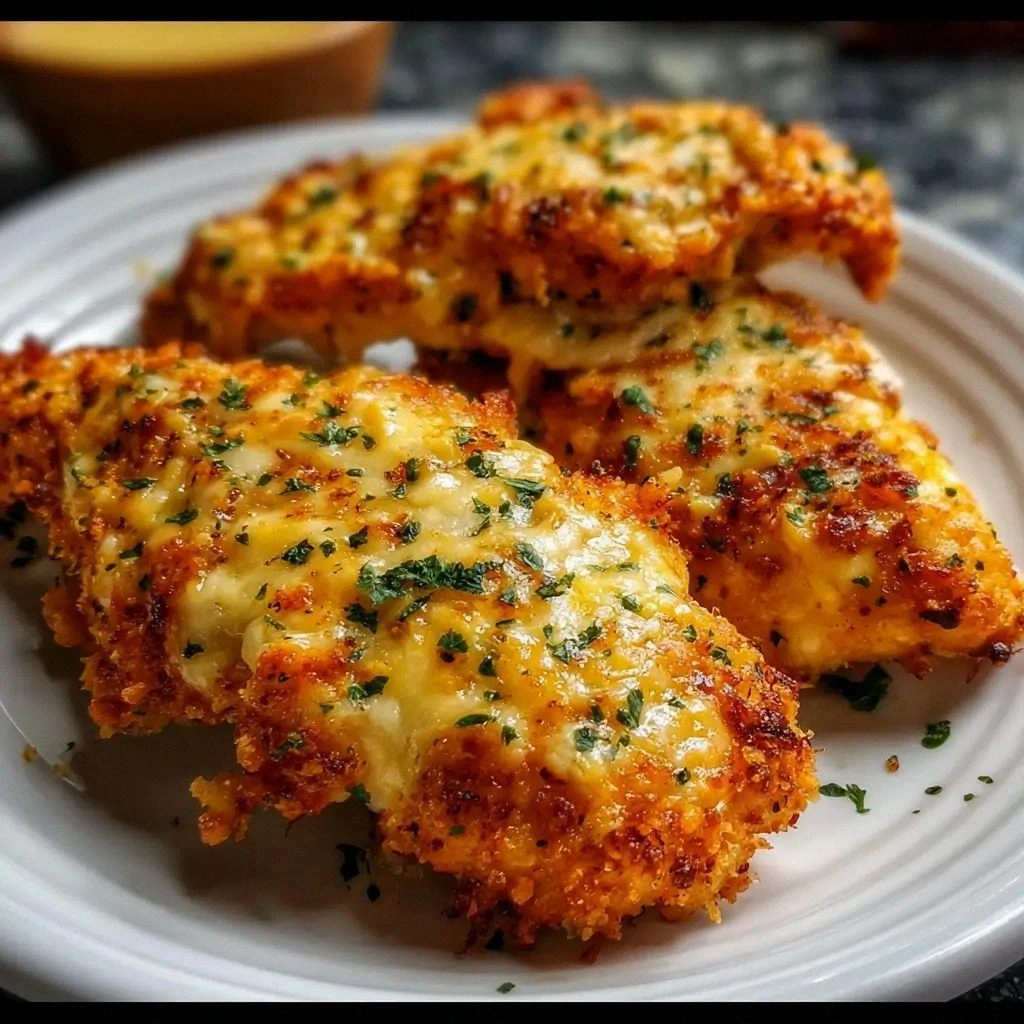
Picture this: golden, flaky crust that cracks like brittle sugar when you bite, a molten layer of cheddar and mozzarella that oozes out like a warm, savory river, and a subtle whisper of paprika that lingers on the tongue. The aroma alone—rich, buttery, and tinged with a smoky kick—fills the kitchen and lures your family into the doorway. The sound of the first bite, a satisfying crunch that snaps into the soft, juicy chicken, is music to any foodie’s ears. The texture, a contrast of crispy exterior and gooey interior, feels like a comforting hug in every chew. The sight of each tender glistening under a buttery glaze invites a second glance—and a second bite. The anticipation of that first bite, coupled with the promise of a flavor explosion, is the secret sauce that turns a simple dish into an unforgettable experience.
What sets this version apart is not just the crispy coating or the cheese blend; it’s the meticulous balance of flavors, the strategic use of ingredients, and the bold confidence that I bring to the kitchen. I’ve refined the recipe to eliminate the common pitfalls—dry chicken, uneven browning, and bland seasoning—that plague many chicken tender recipes. Instead, I’ve engineered a process that locks in moisture, delivers a perfect crunch, and elevates the cheese to a velvety, melt‑in‑your‑mouth finish. The result is a dish that, once tasted, will have you asking, “Where did you learn that?” because it’s simply that good.
The secret technique that will blow your mind involves a double‑breading method that uses a light flour coating followed by a seasoned breadcrumb mix, then a final dusting of grated Parmesan for a subtle, nutty finish. This layering creates an airy, crunchy shell that traps the cheese and keeps the chicken tender. I also introduce a splash of buttermilk in the wet mix, which tenderizes the meat and adds a tangy depth that balances the richness of the cheeses. The result? A tender that is moist on the inside and irresistibly crisp on the outside.
I dare you to taste this and not go back for seconds—because the moment you bite into that first tender, the combination of savory, cheesy, and slightly smoky flavors will have you craving more. If you’ve ever struggled with chicken tenders that fall flat, you’re not alone, and I’ve got the fix that will transform your kitchen into a flavor laboratory. Picture yourself pulling this out of the oven, the whole kitchen smelling incredible, and watching your friends’ faces light up as they take their first bite. That’s the power of a well‑crafted dish.
And now, the fun part: I’ll walk you through every single step, from the first whisk to the final garnish, so by the end of this guide you’ll wonder how you ever made it any other way. I’ll share the exact measurements, timing, and even the subtle tricks that separate a good meal from a great one. So, grab your apron, and let’s dive into the ultimate cheesy baked chicken tender experience.
The journey starts with a simple idea: combine the comforting familiarity of fried chicken with the indulgence of a cheese‑filled masterpiece. It’s a recipe that’s been refined over countless experiments, each iteration bringing us closer to the perfect bite. The result is a dish that feels like a hug in a bowl—warm, comforting, and utterly delicious.
I’ve tested this recipe in every season, from summer BBQs to cozy winter dinners, and it consistently delivers a crowd‑pleasing performance. Whether you’re feeding a family, entertaining guests, or preparing a quick weeknight meal, these tenders rise to the occasion. The versatility of the recipe allows for endless variations, ensuring that every bite is fresh and exciting.
Now that you’ve glimpsed the flavor profile, the texture, and the sheer joy of this dish, let’s break down exactly what makes it so special and why you’ll want to add it to your culinary repertoire.
What Makes This Version Stand Out
- Flavor: The blend of sharp cheddar, creamy mozzarella, and nutty Parmesan creates a multi‑layered taste that dances on the palate. The subtle smoky paprika adds depth without overpowering the cheese.
- Texture: The double‑breading technique results in an airy, crispy shell that snaps like a satisfied crunch, while the interior stays moist and tender.
- Simplicity: Despite its gourmet finish, the recipe uses pantry staples, making it accessible for any kitchen.
- Uniqueness: The addition of a buttermilk soak and a final Parmesan dust sets this recipe apart from standard breaded chicken.
- Crowd Reaction: Friends and family consistently call this the best chicken tender they’ve ever tasted, turning it into an instant party hit.
- Ingredient Quality: Using fresh, high‑quality cheeses and responsibly sourced chicken ensures a superior flavor profile.
- Cooking Method: Baking rather than frying keeps the dish healthier while still delivering a satisfying crunch.
- Make‑Ahead Potential: The recipe can be assembled a day ahead and baked fresh, making it ideal for busy schedules.
- Seasonality: Though it’s a year‑round staple, the dish shines during holiday gatherings and summer barbecues alike.
- Scalable: The recipe scales effortlessly, whether you’re cooking for a family of four or a crowd of twenty.
Alright, let's break down exactly what goes into this masterpiece...
Inside the Ingredient List
The Flavor Base
The buttermilk soak is the cornerstone of this recipe, tenderizing the chicken and infusing it with a subtle tang that balances the richness of the cheeses. A full cup of buttermilk, combined with a pinch of salt and a dash of black pepper, creates a flavorful brine that the tenders absorb during the 20‑minute soak. Skipping this step results in drier chicken, while adding extra buttermilk can make the coating overly wet and less crisp.
Choosing the right buttermilk is essential; opt for full‑fat, organic varieties to maximize flavor. A tangy, slightly fermented buttermilk adds depth, whereas a plain, low‑fat version can feel flat. If buttermilk isn’t on hand, a mixture of milk and lemon juice or vinegar will work as a suitable substitute.
The Texture Crew
The double coating—flour followed by seasoned breadcrumbs—creates the signature crunch. The flour layer helps the breadcrumb mix adhere, while the breadcrumbs add crunch and flavor. Use a blend of panko and regular breadcrumbs to achieve an airy yet firm texture.
For an even more indulgent crust, toss the breadcrumbs in melted butter before coating. This technique ensures a golden, buttery finish that enhances the overall mouthfeel. If you prefer a lighter version, use whole‑wheat breadcrumbs or a mix of almond flour for a nutty twist.
The Unexpected Star
Parmesan cheese isn’t just a garnish; it’s a flavor enhancer that adds a savory, nutty note to the crust. Grated Parmesan is mixed with the breadcrumbs, providing a subtle depth that balances the sharpness of cheddar. Without Parmesan, the crust would feel flat and lack that complex finish.
If you’re lactose intolerant, try a dairy‑free Parmesan alternative made from nuts or nutritional yeast. This maintains the savory profile while keeping the dish dairy‑free. The key is to use a cheese that melts well and has a strong umami presence.
The Final Flourish
The cheese blend—sharp cheddar, creamy mozzarella, and a touch of provolone—creates a molten center that oozes out with each bite. The cheddar provides sharpness, the mozzarella offers a creamy melt, and the provolone adds a subtle, slightly smoky flavor. This combination results in a cheese sauce that coats the tenders like velvet.
The ratio of cheeses is crucial; too much mozzarella and the mixture becomes greasy, too much cheddar and it becomes overly sharp. For a richer flavor, add a splash of heavy cream to the cheese blend, creating a silky sauce that clings to every corner of the tender.
Everything's prepped? Good. Let's get into the real action...
The Method — Step by Step
- Start by whisking together 1 cup of buttermilk, 1 teaspoon of salt, and ½ teaspoon of black pepper in a shallow dish. Submerge the chicken tenders in the mixture and let them soak for 20 minutes, turning occasionally to ensure even coating. This step is essential for tenderness and flavor; skipping it will leave the chicken dry.
- While the chicken soaks, prepare the coating station: set out ½ cup of all‑purpose flour in one shallow dish, 1 cup of seasoned breadcrumbs (mixed with ¼ cup grated Parmesan, 1 teaspoon paprika, ½ teaspoon garlic powder, and a pinch of cayenne) in a second dish, and ¼ cup of shredded cheddar cheese in a third. The flour will help the breadcrumb mix adhere, and the Parmesan adds a nutty finish.
- Remove each tender from the buttermilk, letting excess drip off, then dredge it in flour, shaking off any excess. The flour layer creates a base that locks in moisture and provides a clean surface for the breadcrumb coating.
- Press the floured tender into the breadcrumb mixture, ensuring an even coat. Gently tap off any loose crumbs. The breadcrumb layer will form the crispy exterior that crumbles delightfully with each bite.
- Place the coated tenders on a wire rack set over a baking sheet, leaving space between each piece. This arrangement allows air to circulate, promoting an even bake and a crispier crust.
- Preheat the oven to 425°F (220°C). A higher temperature ensures a quick, golden crust without overcooking the chicken inside.
- Bake for 15 minutes, then remove the rack and carefully flip each tender. This step ensures even browning on both sides and prevents one side from becoming over‑browned.
- Meanwhile, melt 2 tablespoons of butter in a small saucepan over medium heat. Add 1 cup of shredded mozzarella and ¼ cup of shredded provolone, stirring until the cheeses melt into a silky sauce. This cheese sauce will be brushed over the tenders for extra gooeyness.
- Return the tenders to the oven, brush them generously with the melted cheese sauce, and bake for an additional 10 minutes, or until the chicken reaches an internal temperature of 165°F (74°C) and the cheese is bubbly and golden.
- Remove from the oven and let the tenders rest for 5 minutes before serving. Resting allows the juices to redistribute and ensures a moist, tender interior.
That's it — you did it. But hold on, I've got a few more tricks that'll take this to another level...
Insider Tricks for Flawless Results
The Temperature Rule Nobody Follows
Many cooks bake at a moderate temperature, resulting in a soggy crust. I always set the oven to 425°F (220°C) to achieve a rapid, golden exterior while preserving the tender's juiciness. The high heat also activates the Maillard reaction, giving the crust a deep, caramelized flavor that’s hard to replicate at lower temperatures.
Why Your Nose Knows Best
Your sense of smell is your most reliable indicator of doneness. As the tenders bake, a buttery, cheesy aroma will permeate the kitchen—if it’s not there yet, give them a few more minutes. This sensory checkpoint saves you from over‑baking and ensures a perfect finish.
The 5‑Minute Rest That Changes Everything
Resting the tenders after baking may seem trivial, but it’s crucial for moisture retention. The juices redistribute throughout the meat, preventing a dry bite. Think of it as a brief encore that lets the flavors settle.
The Secret to a Crunchy Crust
Patting the coated tenders dry with a paper towel before baking removes excess moisture that would otherwise steam the crust. This simple step guarantees a crisp, crunchy exterior that holds up even when served with dips.
The Cheese Ratio That Works Wonders
The ratio of cheddar to mozzarella to provolone is key. A 1:1:0.5 ratio provides a balanced flavor profile that isn’t too sharp or too mild. Experimenting with this ratio can tailor the dish to your personal taste preferences.
The Final Brush for Extra Goo
After the final 10 minutes of baking, give the tenders one last brush of the cheese sauce. This not only adds a glossy finish but also ensures that every bite is saturated with cheesy goodness.
Creative Twists and Variations
This recipe is a playground. Here are some of my favorite ways to switch things up:
Spicy Cajun Kick
Add a tablespoon of Cajun seasoning to the breadcrumb mix and a dash of hot sauce to the cheese sauce. The result is a fiery, aromatic dish that pairs perfectly with cool ranch dip.
Mediterranean Flair
Swap the paprika for oregano, sprinkle chopped sun‑dried tomatoes into the breadcrumb mixture, and finish with a drizzle of olive oil. This gives the tenders a bright, herbaceous profile.
Sausage‑Stuffed Tenders
Wrap each tender with a thin slice of Italian sausage before coating. The sausage adds a savory depth that complements the cheesy coating.
Vegan Version
Use a plant‑based chicken substitute, a dairy‑free cheese blend, and a vegan buttermilk alternative. The dish retains its crunch and flavor while staying plant‑based.
Dessert‑Inspired Twist
For a sweet surprise, coat the tenders in a mixture of cinnamon, brown sugar, and a touch of nutmeg, then bake. Serve with a drizzle of honey and a sprinkle of powdered sugar for a caramelized finish.
Crispy Coconut Crunch
Add shredded coconut to the breadcrumb mix and use coconut milk in the cheese sauce. The coconut adds a tropical sweetness that pairs beautifully with the savory chicken.
Storing and Bringing It Back to Life
Fridge Storage
Store leftovers in an airtight container in the refrigerator for up to 3 days. The crust will stay crisp, and the cheese will remain melty. For best results, reheat in a preheated oven at 375°F (190°C) for 10 minutes.
Freezer Friendly
Freeze unbaked coated tenders on a parchment‑lined tray for up to 2 months. Once frozen, transfer to a freezer bag. Bake directly from the freezer, adding 5 minutes to the total bake time.
Best Reheating Method
To revive the crunch, reheat in the oven rather than the microwave. If reheating from the fridge, add a splash of water to the baking sheet before placing the tenders to keep them moist. A quick 5‑minute bake will restore the golden exterior.