It started on a rainy Saturday morning when I was trying to salvage a batch of over‑baked banana bread that had turned into a dense, dry slab. I stared at the loaf, feeling the weight of disappointment, when my phone buzzed with a text from a friend who had just come back from a trip to the West Coast and bragged about the blueberry‑lemon loaf she’d made. “Dare you to taste this and not go back for seconds,” she wrote, and that challenge lit a spark in me. I grabbed my pantry, pulled out fresh blackberries, a lemon, and a handful of baking essentials, and decided that this was the moment to reinvent the humble loaf.
As I preheated the oven, the kitchen filled with the sweet, earthy aroma of blackberries simmering on the counter. The bright citrus of the lemon cut through the sweetness like a splash of fresh air, and the sound of the whisk beating in the bowl was a rhythmic drumbeat of anticipation. I could already taste the buttery crumb, the hint of vanilla, and the subtle tang that would dance on the tongue. The texture felt like a promise—soft on the inside, with a slightly crisp crust that would crackle with each bite. My senses were in full bloom, and the kitchen felt like a laboratory where a simple loaf could become a masterpiece.
Most people treat blueberry or blackberry bread as a generic, sweet treat, but this version is anything but ordinary. The key is the balance between the tartness of the berries and the bright zest of the lemon, which together create a flavor profile that feels both indulgent and refreshing. I’ve spent months tweaking the batter, discovering that a splash of milk before folding in the berries preserves their juiciness, and that a pinch of salt amplifies the sweetness without making the loaf feel heavy. The result is a loaf that feels like a summer afternoon captured in a loaf—sweet, tangy, and utterly irresistible.
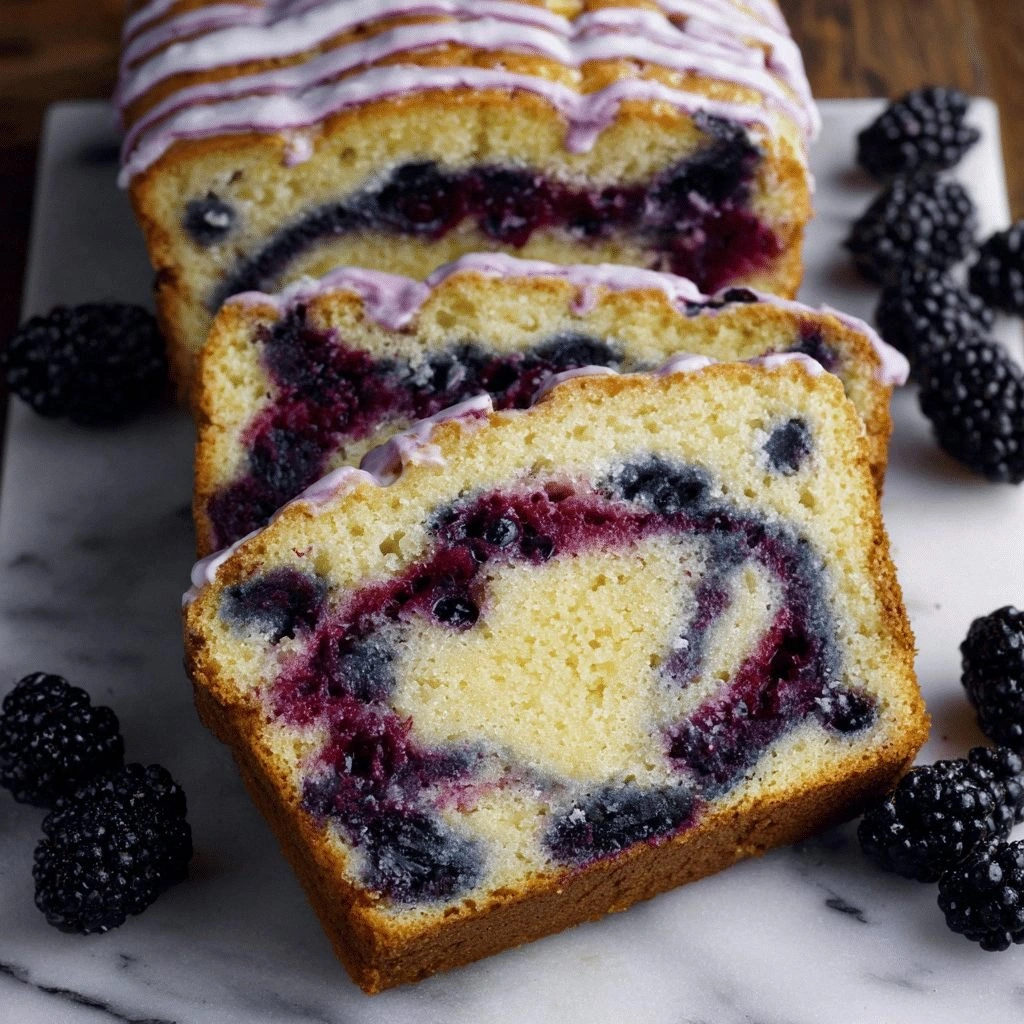
Picture yourself pulling this loaf out of the oven, the whole kitchen smelling incredible, the golden crust shining like a sunrise. Imagine the first slice, the crumb breaking apart with a gentle sigh, and the burst of blackberry juices mingling with a citrus kiss that lingers on the palate. That’s the experience I’m about to share, step by step, so you can recreate this wonder in your own kitchen. Let me walk you through every single step—by the end, you’ll wonder how you ever made it any other way.
What Makes This Version Stand Out
- Flavor: The bold contrast between sweet blackberries and zesty lemon is amplified by a touch of vanilla, creating a taste that feels both familiar and adventurous.
- Texture: A moist crumb with a slightly crisp top results from the precise ratio of flour to liquid, and the gentle folding of berries keeps them intact.
- Freshness: Using fresh blackberries instead of frozen preserves the natural juice and vibrant color, making each slice a visual treat.
- Ease: The recipe requires minimal prep—no fancy equipment, just a whisk, a mixing bowl, and a loaf pan, making it approachable for beginners.
- Versatility: It can be served warm with butter or cold as a snack, and it pairs wonderfully with coffee or tea.
- Make‑Ahead: The loaf keeps well for up to three days when wrapped tightly, and it even freezes beautifully for future indulgence.
Alright, let’s break down exactly what goes into this masterpiece…
Inside the Ingredient List
The Flavor Base
All-purpose flour is the backbone of this loaf, providing structure and a neutral canvas that allows the berries and lemon to shine. The right amount of flour ensures the batter doesn’t become too runny, which could cause the bread to collapse. If you prefer a gluten-free version, replace the flour with a 1:1 blend of rice flour and potato starch, but be prepared to add an extra egg to maintain moisture. The key to a tender crumb is to sift the flour with the baking powder and soda, eliminating clumps that could create uneven pockets.
The Texture Crew
Granulated sugar not only sweetens but also helps with browning, giving the crust a golden hue that’s both appetizing and aromatic. Baking powder and soda act as leavening agents, reacting with the acidic lemon juice to produce carbon dioxide that lifts the loaf. Salt, though small in quantity, balances sweetness and enhances the overall flavor profile, preventing the bread from tasting flat. Eggs bind everything together, while milk adds moisture and helps activate the leavening agents, ensuring the loaf rises evenly.
The Unexpected Star
Fresh blackberries are the star of the show, delivering bursts of tartness that cut through the richness of the batter. Their natural juice adds a subtle glaze to the crust, giving the loaf a glossy finish that looks as good as it tastes. If fresh berries are out of season, frozen berries can be used—just thaw them and pat dry to avoid excess moisture. The berries also provide a pop of color, turning the loaf into a visual centerpiece for any table.
The Final Flourish
Lemon zest brings a bright, aromatic note that elevates the entire loaf, while lemon juice introduces acidity that reacts with the baking soda for extra lift. Vanilla extract deepens the flavor, adding warmth that complements the citrus. Melted butter lends richness and a tender crumb, and its fat content helps keep the bread moist for several days. Together, these ingredients create a harmonious balance that makes this loaf stand out from ordinary fruit breads.
Everything's prepped? Good. Let's get into the real action…
The Method — Step by Step
- Step 1: Preheat and Prep. Set your oven to 350°F (175°C) and line a 9×5-inch loaf pan with parchment paper, leaving a few inches of paper hanging over the edges. This step ensures the loaf doesn’t stick and makes cleanup a breeze. While the oven warms, combine the flour, baking powder, baking soda, and salt in a large bowl, whisking to distribute the leavening agents evenly. The aroma of the dry ingredients already hints at the sweet adventure ahead.
- Step 2: Whisk the Wet. In a separate bowl, whisk together the eggs, milk, melted butter, vanilla extract, and lemon zest until the mixture is smooth. The butter’s fat content enriches the batter, while the vanilla adds depth. The lemon zest introduces a bright citrus aroma that will permeate the loaf as it bakes. Feel the batter’s silky texture as you stir, and notice how the ingredients begin to mingle into a cohesive whole.
- Step 3: Combine Dry and Wet. Pour the wet mixture into the dry ingredients, stirring gently until just combined. Overmixing can lead to a dense loaf, so stop as soon as you see a few streaks of flour. This is the moment of truth—if you’re careful, the batter will be smooth and airy. Kitchen Hack: Use a rubber spatula to fold in the berries, ensuring they are coated without breaking them apart. This keeps the berries intact and prevents them from sinking to the bottom.
- Step 4: Fold in the Berries. Gently fold the fresh blackberries into the batter, taking care not to crush them. The berries should be evenly distributed, creating pockets of juicy sweetness throughout the loaf. As you fold, the batter will darken slightly, a sign that the berries are integrating well. This step also prevents the berries from sinking to the bottom during baking.
- Step 5: Pour and Smooth. Transfer the batter into the prepared loaf pan, smoothing the top with a spatula. Tap the pan lightly on the counter to release any air bubbles that may have formed. The batter should look glossy, with a slight sheen from the butter. Watch Out: Do not overfill the pan; this can cause the loaf to overflow and result in uneven baking.
- Step 6: Bake. Slide the pan into the preheated oven and bake for 30–35 minutes, or until a toothpick inserted into the center comes out clean. The crust should be a deep golden brown, and the loaf will emit a fragrant aroma that fills the kitchen. If the top browns too quickly, tent the loaf loosely with foil to prevent burning. This step is where the batter transforms into a golden, fragrant loaf.
- Step 7: Cool. Remove the loaf from the oven and let it rest in the pan for 10 minutes. This allows the structure to set, making it easier to slice. After 10 minutes, transfer the loaf onto a wire rack to cool completely. The cooling process helps the flavors develop further, creating a richer taste.
- Step 8: Slice and Serve. Once the loaf has cooled, slice it with a serrated knife to avoid crushing the crumb. Serve warm with a pat of butter, or let it sit at room temperature for a few minutes before cutting to allow the flavors to bloom. The crumb should be moist yet sturdy, and the berries should burst with each bite. The final presentation will be a loaf that looks as good as it tastes.
- Step 9: Store or Freeze. Wrap the loaf tightly in plastic wrap and store in the refrigerator for up to three days, or freeze for up to two months. When you’re ready to enjoy it again, thaw at room temperature and warm briefly in a 350°F oven for 5 minutes. This step preserves the freshness and ensures the loaf tastes like it was freshly baked.
That’s it — you did it. But hold on, I've got a few more tricks that'll take this to another level…
Insider Tricks for Flawless Results
The Temperature Rule Nobody Follows
Many bakers think that preheating the oven for only 10 minutes is enough, but the secret to a perfect rise is a fully preheated oven. If the oven is not hot enough, the batter will set too quickly, resulting in a dense loaf. By ensuring the oven reaches the exact temperature before placing the pan, you give the leavening agents the chance to work properly, creating a light, airy crumb.
Why Your Nose Knows Best
As the loaf bakes, the aroma of lemon and blackberries will begin to mingle with the sweet scent of butter. Trust that smell; it’s the cue that the loaf is nearing perfection. If you notice a sharp, burnt scent, it’s time to tent the loaf with foil to prevent over‑browning.
The 5-Minute Rest That Changes Everything
After removing the loaf from the oven, let it rest in the pan for exactly 10 minutes before transferring it to a wire rack. This brief pause allows the structure to set, preventing the loaf from cracking when you slice it. The rest also lets the flavors meld, giving the bread a deeper, more complex taste.
Use Fresh Berries, Not Frozen
Fresh berries hold their shape and juice better than frozen ones. If you must use frozen berries, thaw them at room temperature and pat dry with a paper towel. This step prevents excess liquid from diluting the batter, keeping the loaf moist and flavorful.
Don't Skip the Parchment Paper
Even with a non‑stick pan, parchment paper provides an extra layer of protection. It ensures the loaf slides out easily and keeps the edges from sticking, which can ruin the presentation and texture.
Creative Twists and Variations
This recipe is a playground. Here are some of my favorite ways to switch things up:
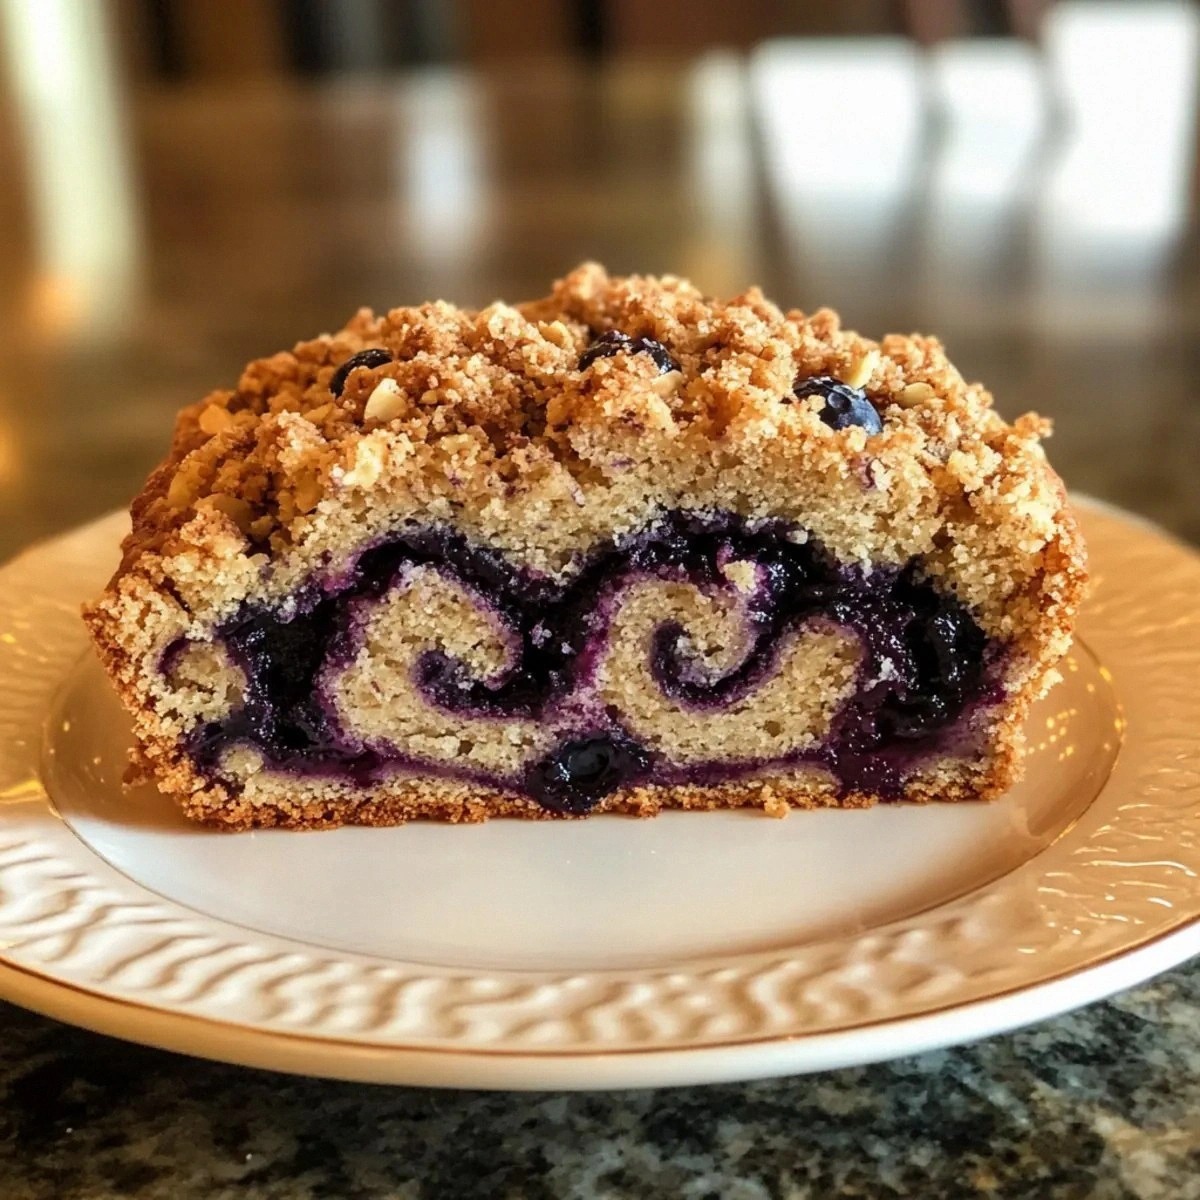
Blueberry Lemon Swirl
Swap half the blackberries for fresh blueberries and swirl the berries into the batter with a spoon before baking. The alternating colors create a marbled effect, and the blueberries add a subtle sweetness that balances the lemon. This variation is perfect for a brunch that looks as good as it tastes.
Almond Crust
Sprinkle a handful of sliced almonds on top of the batter before baking. The nuts toast to a golden crunch, providing a contrasting texture and a nutty flavor that pairs beautifully with the citrus. This twist adds a protein boost and makes the loaf more filling.
Chocolate Chip Surprise
Fold in a quarter cup of dark chocolate chips along with the berries. The chocolate melts slightly during baking, creating pockets of rich chocolate that contrast with the bright lemon. This version turns the loaf into a decadent treat for chocolate lovers.
Herb‑Infused Bread
Add a tablespoon of chopped fresh rosemary to the batter for an aromatic, savory twist. The rosemary pairs well with the lemon, giving the loaf a sophisticated flavor profile that’s great for afternoon tea.
Gluten‑Free Delight
Replace the all-purpose flour with a gluten‑free blend, and add an extra egg to maintain moisture. The resulting loaf will still have a tender crumb, making it suitable for those with gluten sensitivities.
Mini Loaf Batches
Divide the batter into two 6‑inch loaf pans and bake separately. This method is ideal for single servings or for guests who want a personal slice. The smaller loaf bakes faster, giving you a crispier crust.
Storing and Bringing It Back to Life
Fridge Storage
Wrap the cooled loaf tightly in plastic wrap and store in the refrigerator for up to three days. The cold environment preserves the moisture and prevents the bread from drying out. When you’re ready to eat, let it sit at room temperature for 15 minutes to soften the crumb.
Freezer Friendly
Place the loaf in a freezer bag, removing as much air as possible, and freeze for up to two months. When you’re ready to enjoy it, thaw the loaf overnight in the refrigerator, then warm it in a 350°F oven for 5 minutes. This process restores the warmth and softness of the bread.
Best Reheating Method
To bring the loaf back to life, preheat your oven to 350°F (175°C). Place the loaf on a baking sheet and warm for 5–7 minutes, or until the crumb feels warm and fragrant. A tiny splash of water in the pan before baking creates steam, keeping the bread moist and preventing it from drying out during reheating.