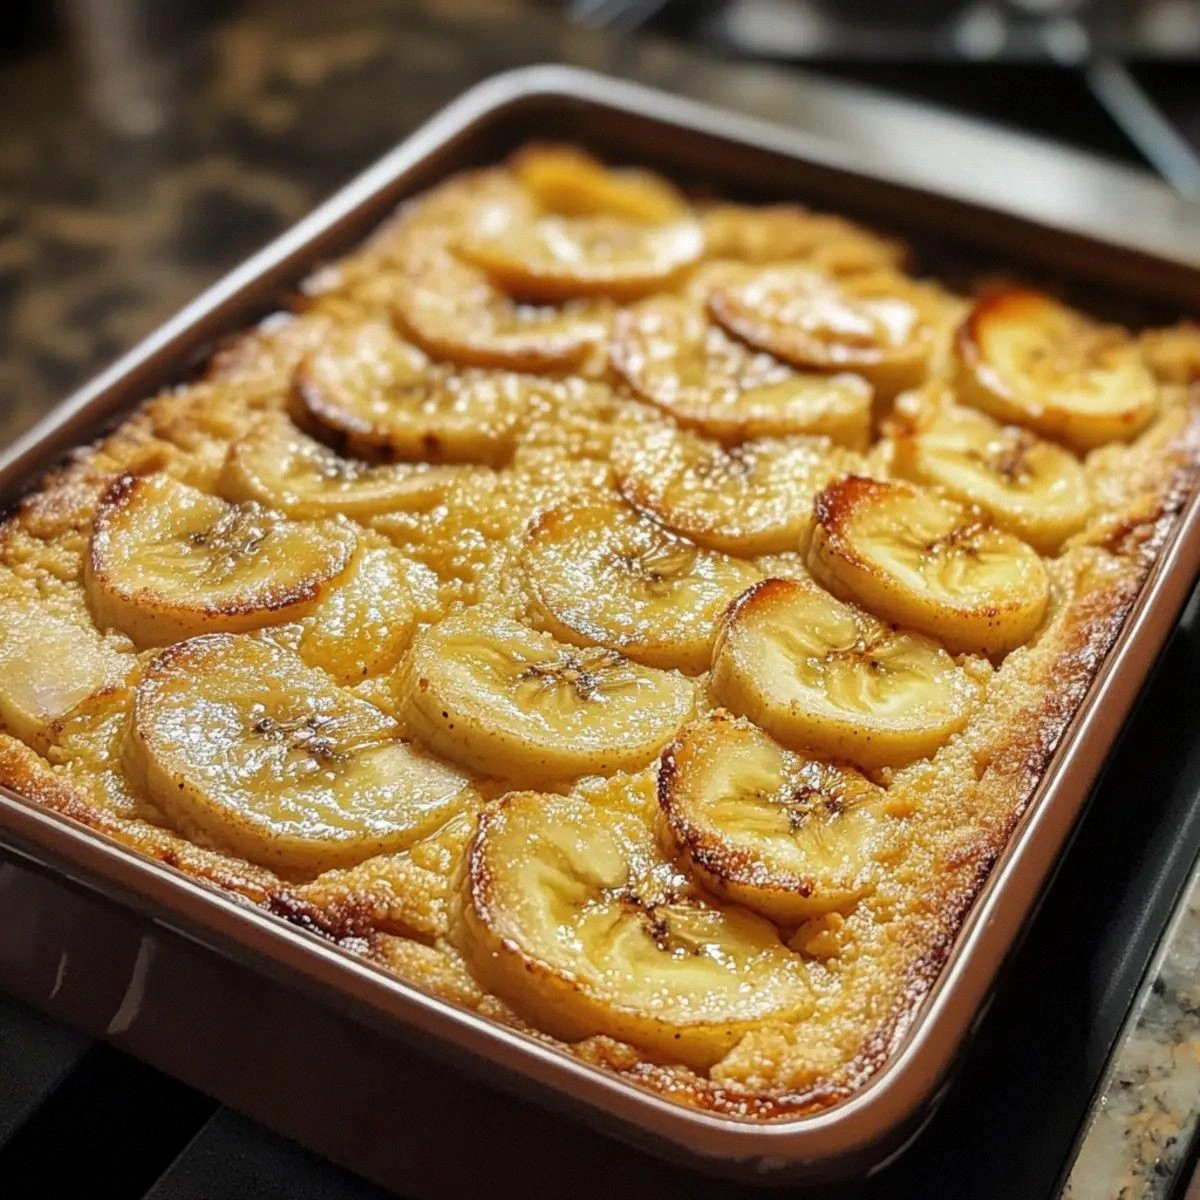
I was halfway through a late‑night binge on a bland, prepackaged snack when the kitchen lights flicked off. The next thing I remembered was the faint, sweet aroma of bananas wafting from the fridge, the kind that makes your stomach rattle like a drum. I grabbed a handful of overripe bananas, a tin of semolina, and a splash of milk, and decided to throw everything into a baking tray. The result? A golden, spiced, banana‑laden semolina bake that exploded in flavor the moment it hit the counter. I was so thrilled that I almost dropped the tray—just to test how firm it was. That moment of panic turned into a revelation: I had stumbled upon a recipe that could replace every bland breakfast, dessert, or even a quick snack, all while using ingredients I already had on hand.
Picture this: the oven preheats to 375°F, and you feel the warm air brush against your face like a gentle hug. The bananas, bruised and sweet, release a syrupy steam that mingles with the scent of cinnamon and vanilla, turning the kitchen into a fragrant, cozy cocoon. When you lift the tray, a golden crust crackles, and the interior is a silky, custard‑like texture that clings to the spoon. The first bite is a burst of banana sweetness, followed by a subtle nutty crunch and a whisper of caramelized sugar. The whole experience feels like a comforting hug wrapped in a crunchy shell, a simple pleasure that turns an ordinary day into something memorable.
What makes this version stand out is that it’s not just another banana bread. I dared you to taste this and not go back for seconds, and I’ve never heard a single “I’m not hungry” after a slice. The secret lies in the semolina, which gives it a unique, slightly gritty texture that pairs beautifully with the banana’s smoothness. The addition of butter, baking powder, and a pinch of salt elevates the flavor profile, while the cinnamon and vanilla add depth without overpowering the banana. The result is a dish that feels like a cross between a quick snack and a decadent dessert, yet it’s light enough to serve for breakfast or a midnight craving. I’ll be honest— I ate half the batch before anyone else got a taste, and the kitchen smelled like a bakery for the next hour.
Most recipes get this completely wrong, either by overbaking the bananas or underseasoning the batter. I discovered that the key to a perfect bake is to let the bananas soften just enough to release their natural sugars without turning mushy. That’s why I use overripe bananas— they’re the sweet, fragrant kind that turns into a caramelized glaze when baked. Picture the batter as a silky sauce that coats the semolina like velvet, creating a mouth‑watering contrast of textures. Picture yourself pulling this out of the oven, the whole kitchen smelling incredible, and the tray shimmering with a golden crust. If you’ve ever struggled with banana desserts, you’re not alone—and I’ve got the fix.
What Makes This Version Stand Out
- Flavor: The combination of ripe bananas, cinnamon, and vanilla creates a layered taste that feels both familiar and adventurous. The sweetness is natural, not syrupy, and the spices add warmth without overwhelming.
- Texture: Semolina gives a slight chew that contrasts beautifully with the soft banana interior, while the butter provides a tender crumb. The result is a bite that’s satisfying yet not heavy.
- Ingredient Simplicity: No fancy flours or obscure spices—just pantry staples you’re likely to have. This makes the recipe accessible to everyone.
- Make‑Ahead Friendly: You can bake the tray a few hours ahead and store it in the fridge; it tastes just as good the next day.
- Versatility: Serve it warm with a drizzle of honey or maple syrup, or let it cool and top with yogurt and fresh berries.
- Crowd‑Pleaser: The dish is large enough to feed a family or serve as a dessert for guests, and the flavors appeal to both kids and adults.
Alright, let’s break down exactly what goes into this masterpiece...
Inside the Ingredient List
The Flavor Base
Semolina is the unsung hero of this dish. It’s a coarse wheat flour that brings a subtle nuttiness and a pleasant chew. Unlike all-purpose flour, semolina doesn’t absorb liquid as readily, which means the batter stays moist and the final product retains a light, airy texture. If you’re in a pinch and don’t have semolina, you can substitute it with whole wheat flour or a 50/50 blend of all-purpose and whole wheat. The key is to keep the ratio of dry to wet ingredients balanced so the batter doesn’t become too dense.
The Texture Crew
Butter and milk are the lubricants that keep the batter smooth and prevent the semolina from sticking. Butter adds a rich, creamy flavor that enhances the banana’s natural sweetness. Milk keeps the mixture moist and helps the batter rise evenly. A pinch of salt is essential—it brings out the flavors and balances the sweetness. Don’t skip the salt; a small amount can transform a good batter into a great one.
The Unexpected Star
The overripe bananas are the secret weapon. They release natural sugars when baked, creating a caramelized glaze that coats the semolina like a glossy coat. The bananas also add moisture, so you don’t need to add extra liquid. If you can’t find overripe bananas, use ripe ones but reduce the amount of sugar slightly to avoid a cloying taste.
The Final Flourish
Cinnamon and vanilla are the finishing touches that tie everything together. Cinnamon adds warmth and depth, while vanilla provides a sweet, floral undertone. A handful of chopped nuts (walnuts, pecans, or almonds) adds crunch and a nutty flavor that complements the banana. Finish with a drizzle of honey or maple syrup after baking to add shine and a touch of extra sweetness.
Everything’s prepped? Good. Let’s get into the real action...
The Method — Step by Step
- Preheat and Prep: Set your oven to 375°F (190°C) and line a 9×13 inch baking pan with parchment paper. This step is critical because a properly lined pan prevents sticking and makes cleanup a breeze. While the oven warms, gather all your ingredients so you’re not scrambling for a banana mid‑mix.
- Blend the Bananas: Peel and mash the bananas in a bowl until they’re almost smooth. If you prefer a finer texture, pulse them in a food processor. The mashed banana should be thick but still pourable. This step ensures even distribution of banana flavor and prevents large lumps.
- Mix Dry Ingredients: In a separate bowl, whisk together semolina, baking powder, and a pinch of salt. The baking powder is the leavening agent that gives the batter a slight lift. Whisking ensures the powder is evenly distributed, preventing uneven rise or pockets of raw flour.
- Combine Wet Ingredients: Melt the butter in a small saucepan or microwave, then let it cool slightly. Add the milk, vanilla extract, and mashed bananas to the melted butter. Stir until the mixture is smooth. The butter’s fat coats the semolina, creating a tender crumb.
- Merge Wet and Dry: Pour the wet mixture into the dry ingredients and stir until just combined. Be careful not to overmix; a few streaks of semolina are fine. Overmixing can develop gluten, making the final product dense.
- Add Nuts and Cinnamon: Fold in the chopped nuts and cinnamon. The nuts add a satisfying crunch, while cinnamon brings a warm, spiced undertone. If you’re using a nut allergy, you can omit the nuts or replace them with dried fruit.
- Pour into Pan: Transfer the batter to the prepared pan, spreading it evenly with a spatula. The batter should sit just below the top of the pan—no more, no less. This ensures even baking and prevents a soggy center.
- Bake: Place the tray in the oven and bake for 25–30 minutes, or until the top turns golden brown and a toothpick inserted into the center comes out clean. The aroma during the last ten minutes is the most irresistible—think warm, sweet, and slightly nutty.
- Cool and Drizzle: Remove the tray from the oven and let it cool for 10 minutes before drizzling honey or maple syrup over the top. The syrup should seep into the cracks, giving the dish a glossy finish. Allow the tray to cool completely before slicing.
- Serve: Slice the tray into squares or bars and serve warm or at room temperature. Pair with a scoop of vanilla ice cream or a dollop of Greek yogurt for a decadent treat. If you’re short on time, you can also cut the tray into individual portions and store them in the fridge.
That’s it— you did it. But hold on, I’ve got a few more tricks that’ll take this to another level...
Insider Tricks for Flawless Results
The Temperature Rule Nobody Follows
Most bakers set their ovens to a flat temperature, but the truth is that ovens have hot spots. Use a thermometer to check the actual temperature and adjust accordingly. If your oven runs hot, lower the temperature by 25°F to avoid overbaking. This simple tweak ensures the batter rises evenly and the edges stay tender.
Why Your Nose Knows Best
Your nose is the best judge of doneness. When the aroma shifts from sweet banana to a warm, nutty scent, you’re in the final minutes of baking. Trust that instinct; it’s a reliable cue that the tray is ready to come out of the oven.
The 5-Minute Rest That Changes Everything
After baking, let the tray rest for at least five minutes before slicing. This brief pause allows the batter to set, preventing the squares from falling apart. It also lets the flavors meld, creating a richer, more cohesive taste.
The Sweet Finish
Drizzling honey or maple syrup after baking adds a glossy sheen and a burst of natural sweetness. If you’re watching sugar, a light drizzle is enough to elevate the dish without overpowering the banana flavor.
The Crumbly Edge
If you prefer a crisper edge, sprinkle a thin layer of sugar on top before baking. The sugar caramelizes, giving the crust a delightful crunch. Just be careful not to add too much; you don’t want it to burn.
The Storage Secret
Wrap the cooled tray tightly in plastic wrap before refrigerating. This prevents the surface from drying out and keeps the batter moist. When you’re ready to serve, let it sit at room temperature for 10 minutes for maximum flavor.
Creative Twists and Variations
This recipe is a playground. Here are some of my favorite ways to switch things up:
Chocolate Chip Carnival
Fold in a cup of semi‑sweet chocolate chips before baking. The chocolate adds a rich, indulgent layer that pairs perfectly with the banana’s natural sweetness.
Nutty Banana Crunch
Add a handful of chopped pecans or walnuts on top of the batter before baking. The nuts will toast slightly, giving a crunchy, buttery contrast to the soft interior.
Citrus Twist
Add the zest of one orange or lemon to the batter. The citrus brightens the flavor profile and adds a refreshing note that balances the banana’s richness.
Spiced Up
Replace the cinnamon with a pinch of nutmeg or allspice for a deeper, spicier flavor. The warm spices pair wonderfully with the banana’s sweetness.
Almond Butter Swirl
Swirl in a tablespoon of almond butter before baking. The almond butter adds a nutty depth and a silky texture that elevates the overall mouthfeel.
Vegan Version
Swap the butter for coconut oil and use plant‑based milk. The result is a vegan-friendly version that still delivers the same comforting, sweet flavor.
Storing and Bringing It Back to Life
Fridge Storage
Wrap the cooled tray tightly in plastic wrap and store it in the refrigerator for up to 4 days. The moisture from the wrap prevents the surface from drying out, keeping the texture tender.
Freezer Friendly
Slice the tray into individual portions and wrap each slice in parchment paper, then place them in a freezer bag. Freeze for up to 3 months. When you’re ready to eat, thaw at room temperature for 20 minutes.
Best Reheating Method
Reheat slices in the microwave for 20–30 seconds or in a preheated oven at 350°F for 5 minutes. Add a tiny splash of water before reheating to create steam, which restores moisture and prevents the banana from drying out.